Bridge Pose

Bridge Pose (Setu Bandha Sarvangasana): How To Do It, Benefits & Precautions

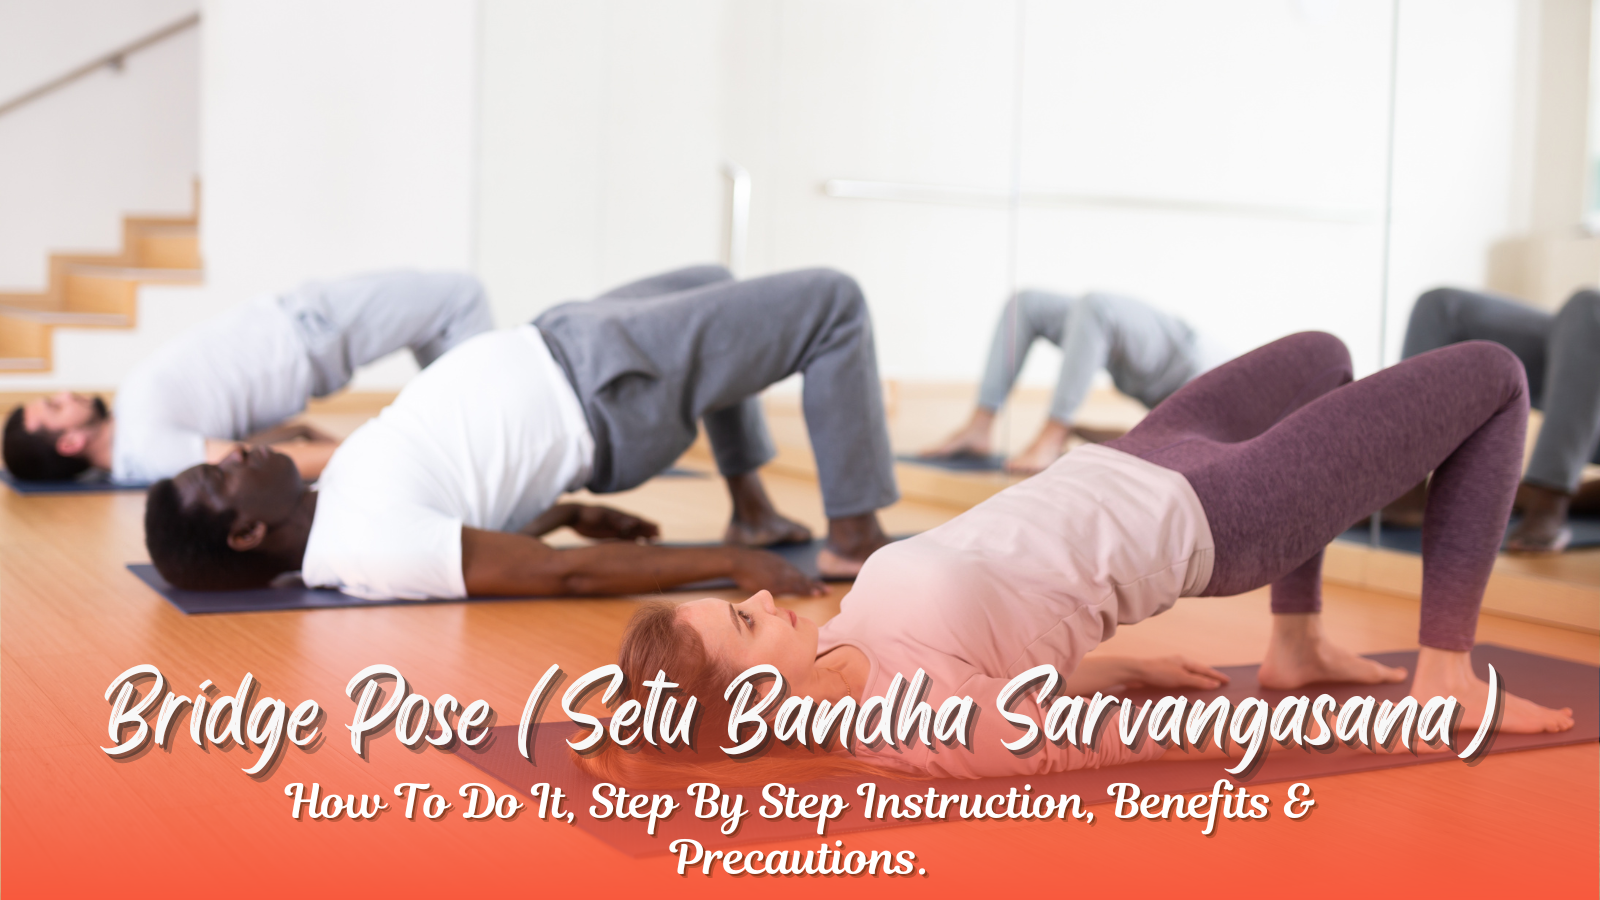
Bridge Pose, also known as Setu Bandha Sarvangasana, is a versatile and rejuvenating yoga posture that offers profound benefits for the body and mind. Whether you’re a beginner exploring supported poses or an advanced practitioner delving into challenging variations, Bridge Pose yoga has something to offer for everyone. In this blog, we’ll dive deep into the benefits of Bridge Pose, step-by-step instructions, variations, and precautions to ensure you practice it effectively.


What is Bridge Pose?

  • Bridge Pose Defined
    • Sanskrit Name: Setu Bandha Sarvangasana.
    • The pose resembles the structure of a bridge, hence its name.
    • It is a backbend posture that promotes strength, flexibility, and relaxation.
  • Why It’s Popular
    • Known for its calming and energizing effects, the yoga Bridge Pose is a favorite in restorative and dynamic sequences alike.

How to Do Bridge Pose: Step-by-Step Guide

Mastering the Bridge Pose requires proper alignment and breath control. Here’s how to do it:

  1. Start with the Basics
    • Lie down on your back on a yoga mat.
    • Bend your knees and place your feet hip-width apart, with your heels close to your glutes.
    • Keep your arms by your sides, palms facing down.
  2. Engage the Feet and Core
    • Press firmly into your feet, ensuring equal distribution of weight across the big toe mound, little toe mound, inner heel and outer heel.
    • Engage your core muscles to support the lift.
  3. Lift the Hips
    • Inhale deeply and slowly raise your hips toward the ceiling.
    • Maintain alignment by keeping your knees above your ankles.
  4. Interlace the Fingers
    • Roll your shoulders underneath your body and interlace your fingers beneath your hips for extra lift.
  5. Open the Chest and Hold the Pose
    • Expand your chest and create space in the throat.
    • Hold the pose for 5–10 breaths, focusing on even, steady breathing.
  6. Release Safely
    • Exhale as you slowly lower your hips back to the mat.
    • Rest for a few breaths before transitioning to the next pose.

Benefits of Bridge Pose Yoga

Practicing the yoga Bridge Pose regularly brings a plethora of benefits for the mind and body:

  • Physical Benefits
    • Strengthens the Back and Glutes: Engages and tones the lower back, hamstrings and glutes.
    • Improves Spinal Flexibility: Helps maintain a healthy, flexible spine.
    • Opens the Chest and Shoulders: Counteracts the effects of poor posture caused by sitting for long hours.
    • Enhances Hip Flexor Mobility: Provides a deep stretch to tight hip flexors, promoting greater mobility.
    • Supports Thyroid Health: Stimulates the thyroid gland through gentle throat compression.
  • Mental Benefits
    • Relieves Stress: Acts as a gentle inversion, calming the nervous system and reducing stress.
    • Boosts Energy: Improves blood circulation, leaving you feeling revitalized.
    • Promotes Focus: Encourages mindfulness by synchronizing movement with breath.

Bridge Pose Variations for All Levels

To make your practice more engaging and cater to different skill levels, try these variations:

  • Supported Bridge Pose:
    • Place a yoga block under your sacrum for support.
    • Ideal for beginners or those with lower back discomfort.
  • Advanced Bridge Pose:
    • Deepen the backbend by lifting your chest higher and clasping your hands more firmly.
    • Suitable for experienced yogis looking for a challenge.
  • One-Legged Bridge Pose:
    • Lift one leg straight toward the ceiling while holding the traditional Bridge Pose.
    • Enhances balance, strength, and core stability.
  • Dynamic Bridge Pose:
    • Flow between lifting and lowering your hips in sync with your breath.
    • Adds a cardio element to your practice.
  • Revolved Bridge Pose:
    • Incorporate a gentle twist by moving your hips slightly to one side.
    • Stimulates the digestive system and increases spinal mobility.

Benefits of Bridge Pose in Yoga Teacher Training

For those pursuing yoga teacher training programs, mastering Bridge Pose is essential:


Precautions and Modifications for Bridge Pose

Precautions:

  • Avoid the pose if you have neck, shoulder or spinal injuries.
  • Pregnant women should opt for supported variations or avoid the pose entirely after the first trimester.
  • Practice caution if you have high blood pressure or migraines.

Modifications:

  • Use a yoga block for added support under the sacrum.
  • Keep your feet wider apart for better stability.
  • Place a folded blanket under your shoulders to ease the strain on your neck.
How to do Bridge Pose Setu Bandha Sarvangasana Benefits - Best yoga teacher training in Rishikesh

Incorporating Poses on a Bridge Into Your Yoga Routine

Bridge Pose fits seamlessly into various yoga routines:

  • Morning Yoga:
    • Kickstart your day with a gentle flow, including Bridge Pose for an energy boost.
  • Evening Practice:
    • Use the Supported Bridge Pose to relax and wind down after a long day.
  • Strengthening Sequences:
    • Combine it with poses like Plank and Warrior II for a full-body workout.
  • Restorative Yoga:
    • Include the one legged bridge pose with props for a calming, meditative experience.

FAQs About Bridge Pose

  • What are the yoga Bridge Pose benefits?
    • It strengthens the back, glutes, and legs, improves spinal flexibility, and calms the mind.
  • Can beginners practice Bridge Pose?
    • Yes! Start with Supported Bridge Pose and gradually progress to more advanced versions.
  • What are the benefits of Bridge Pose in yoga for advanced practitioners?
    • Enhances core strength, balance, and flexibility when practiced with variations like the One-Legged Bridge Pose.
  • What are the precautions for practicing Bridge Pose?
    • Avoid the pose if you have neck or back injuries, and always practice with proper alignment.

Conclusion: Why Bridge Pose Should Be in Your Yoga Routine

Bridge Pose (Setu Bandha Sarvangasana) is a timeless yoga posture that bridges the gap between strength and relaxation. From supported Bridge Pose for beginners to advanced Bridge Pose variations, this pose is adaptable for every yogi. Its physical and mental benefits make it a cornerstone in routines across all levels. Whether you’re pursuing a 200 Hour Yoga Teacher Training Course in Rishikesh or simply enhancing your home practice, incorporating Bridge Pose can elevate your yoga journey.

So, roll out your mat, breathe deeply, and let Bridge Pose open new pathways to strength, flexibility, and mindfulness!

Chair Pose

Chair Pose (Utkatasana) : How To Do IT, Benefits & Precautions

The Chair Pose, or Utkatasana, is one of the most powerful yet accessible yoga poses. This versatile posture strengthens the body, enhances mental clarity, and improves balance. Whether you’re a beginner exploring chair yoga poses or an experienced practitioner aiming to deepen your practice, the Chair Pose offers numerous benefits. In this detailed guide, we’ll explore the step-by-step instructions, key benefits, variations and modifications, along with safety precautions to ensure you practice effectively.


What Is Chair Pose (Utkatasana)?

  • Chair Pose Defined:
    Chair Pose, or Utkatasana in Sanskrit, translates to “powerful pose” or “intense pose.” The body mimics the action of sitting in a chair while engaging multiple muscle groups.
  • Why It’s Popular:
    Chair Pose is a staple in yoga sequences due to its ability to build strength, flexibility and focus simultaneously. From beginner printable chair yoga poses to advanced variations like Revolved Chair Pose, this posture suits yogis at all levels.

How to Do Chair Pose: Step-by-Step Guide

Mastering Chair pose variations requires attention to alignment and breath. Follow these steps for proper execution:

  1. Start in Mountain Pose (Tadasana):
    • Stand tall with your feet together or hip-width apart.
    • Keep your arms by your sides, shoulders relaxed, and chest open.
  2. Raise Your Arms:
    • Inhale deeply and stretch your arms overhead.
    • Keep your palms facing each other and ensure your shoulders are away from your ears.
  3. Bend Your Knees:
    • Exhale as you bend your knees and lower your hips, mimicking a sitting-down pose chair.
    • Aim to bring your thighs parallel to the floor. Your knees should align with your ankles, and your weight should be evenly distributed across both feet.
  4. Engage the Core:
    • Draw your navel toward your spine to activate the abdominal muscles and protect your lower back.
  5. Focus on Alignment:
    • Keep your spine straight and chest lifted. Avoid rounding your back or leaning too far forward.
    • Imagine lengthening your torso upwards as you hold the pose.
  6. Hold the Pose:
    • Maintain the position for 5–10 breaths or as long as comfortable.
    • Focus on steady, even breathing to enhance mental clarity.
  7. Release the Pose:
    • Inhale as you straighten your legs and lower your arms.
    • Return to Mountain Pose, resting briefly before continuing your practice.

Key Benefits of Chair Pose Yoga

Chair Pose offers a host of physical, mental and emotional benefits. Here’s why it’s a must-have in your yoga routine:

1. Builds Lower Body Strength

  • Utkatasana engages major muscle groups like the quadriceps, hamstrings, glutes and calves.
  • Regular practice strengthens these muscles, promoting stability and endurance.

2. Improves Posture

  • The pose strengthens the back and core muscles, reducing slouching and supporting better spinal alignment.

3. Enhances Core Stability

  • Activating the core muscles during Chair Pose improves balance, stability, and overall body awareness.

4. Boosts Flexibility

  • Chair Pose stretches the hips, thighs, and calves, enhancing mobility and flexibility.

5. Stimulates Digestion

  • The gentle compression of the abdomen during this pose aids in stimulating digestive organs, improving digestion.

6. Promotes Mental Focus

  • Holding Chair Pose requires concentration and mindfulness, helping to quiet the mind and enhance focus.

7. Energizes the Body

  • By engaging multiple muscle groups simultaneously, Chair Pose improves blood circulation and boosts energy levels.

Variations of Chair Pose for All Levels

To keep your practice engaging and cater to your skill level, try these variations:

1. Revolved Chair Pose (Parivrtta Utkatasana)

  • Add a detoxifying twist by bringing your hands to a prayer position and rotating your torso to one side.
  • This variation enhances spinal flexibility and stimulates internal organs.

2. Shinji Chair Pose

  • This advanced variation involves a deeper squat, emphasizing flexibility and strength in the hips and thighs.

3. Supported Chair Pose

  • Use a wall or a yoga block for support. This is especially helpful for beginners or those recovering from injuries.

4. Chair Pose with Arm Variations

  • Try extending your arms forward, crossing them over your chest, or clasping your hands behind your back for a different stretch.

5. Beginner Printable Chair Yoga Poses

  • Download printable guides to simplify your practice and build confidence.

How Chair Pose Fits into Yoga Teacher Training

If you’re pursuing yoga teacher training, mastering foundational poses like Utkatasana is crucial. Programs such as the 200-hour Yoga Teacher Training Course in Rishikesh, 300-hour Yoga Teacher Training in Rishikesh and 500-hour Yoga Teacher Training in Rishikesh place significant emphasis on alignment, modifications and sequencing. Understanding Chair Pose thoroughly will enhance your teaching skills and personal practice.


Precautions and Modifications for Yoga Chair Pose

Precautions:

  • Avoid Chair Pose if you have severe knee, ankle, or lower back issues.
  • Pregnant individuals should avoid deep squats or practice a supported variation with a chair or wall.
  • Consult a healthcare professional if you have any pre-existing medical conditions.

Modifications:

  1. Use a Chair for Support:
    • Practice with an actual chair to build strength and confidence gradually.
  2. Keep Feet Hip-Width Apart:
    • This adjustment provides better stability and ease for beginners.
  3. Bend Knees to a Comfortable Depth:
    • Avoid lowering your hips too deeply if it causes discomfort.
  4. Engage Core Gently:
    • Focus on engaging the core without overstraining the back.

How to Incorporate Chair Pose Into Your Yoga Practice

Chair Pose can be seamlessly integrated into any yoga sequence. Here are a few ideas:

  • Sitting down pose chair, Use it as part of your warm-up to activate lower body muscles.
  • Combine it with poses like Warrior I, Warrior II or Crescent Lunge for a dynamic flow.
  • Include Revolved Chair Pose in detoxifying sequences for added benefits.

FAQs About Chair Pose

1. What are the benefits of Chair Pose in yoga?

  • Chair Pose strengthens the lower body, improves posture, tones the core and enhances mental focus.

2. Is Chair Pose suitable for beginners?

  • Yes! Beginners can start with modifications, such as using a chair or keeping feet hip-width apart.

3. How can I deepen my practice of Chair Pose?

  • Explore advanced variations like Revolved Chair Pose or Shinji Chair Pose for added challenges.

Conclusion: Why Chair Pose Deserves a Place in Your Practice

The Chair Pose (Utkatasana) is more than just a yoga posture; it’s a holistic practice that strengthens the body, sharpens the mind, and nurtures the spirit. Whether you’re aiming to build lower body strength, improve flexibility, or enhance mental clarity, this pose has something for everyone. By incorporating its variations and modifications, you can tailor Chair Pose to suit your needs and goals.

If you’re inspired to deepen your yoga journey, consider enrolling in the Best Yoga Teacher Training in Rishikesh to refine your practice and share the transformative power of yoga with others.

So, take a deep breath, embrace the challenge and let the Chair Pose guide you toward greater strength, balance, and mindfulness!

Corpse Pose

Corpse Pose (Savasana) : How To Do It, Benefits & Precautions

The Corpse Pose, also known as Savasana, is a seemingly simple yet profoundly transformative yoga pose. Often practiced at the end of a yoga session, it allows complete physical and mental relaxation. In this guide, we’ll explore how to do the Corpse Pose, its benefits, precautions and why it’s an essential part of your yoga practice.


What is Corpse Pose (Savasana)?

  • Corpse Pose Yoga is a relaxation pose where the body mimics the stillness of a corpse.
  • The Sanskrit word “Savasana” comes from “Shava” (corpse) and “Asana” (pose)
  • It’s typically done at the end of a yoga class to integrate the benefits of the practice
  • Practicing Corpse Pose in Yoga provides a bridge between physical activity and complete rest, promoting deeper relaxation

How to Do the Corpse Pose

Follow these steps for a calming Savasana Corpse Pose:

  1. Find a Quiet Space
    • Choose a serene location, preferably on a yoga mat or soft surface.
  2. Lie Flat on Your Back
    • Extend your legs slightly apart and let your arms rest beside you with palms facing up.
  3. Close Your Eyes
    • Gently close your eyes and soften your facial muscles.
  4. Relax Muscle Groups
    • Starting from your feet, consciously relax each body part up to your head.
  5. Focus on Your Breath
    • Take slow, deep breaths through your nose. Observe the rise and fall of your belly.
  6. Let Go of Thoughts
    • As thoughts emerge, acknowledge them without judgment and redirect your focus to your breath.
  7. Stay Still
    • Remain in the pose for 5–10 minutes.
  8. Exit Slowly
    • Wiggle your fingers and toes, then roll to one side before sitting up.

Benefits of Corpse Pose

Incorporating Savasana Corpse Pose into your routine offers physical, mental and emotional benefits:

  • Reduces Stress and Anxiety
    • Deep relaxation calms the nervous system, helping alleviate stress and anxiety.
  • Enhances Sleep Quality
    • Practicing Savasana before bedtime can promote better sleep.
  • Relieves Physical Tension
    • Conscious muscle relaxation releases stiffness and tension.
  • Boosts Energy Levels
    • Short periods of complete rest rejuvenate the body and mind.
  • Improves Focus and Mindfulness
    • Letting go of distractions helps sharpen concentration.

For those enrolled in the 200 Hour Yoga Teacher Training Course in Rishikesh, practicing Savasana can deepen their understanding of yoga’s restorative aspects.


Precautions and Modifications

Although Savasana Corpse Pose is generally safe, consider these precautions:

  • Back Support
    • If lying flat is uncomfortable, place a bolster under your knees to relieve pressure on the lower back.
  • Pregnancy
    • Pregnant individuals can practice a side-lying variation.
  • Chronic Pain or Injury
    • Consult a yoga teacher or therapist for personalized modifications.
  • Mental Restlessness
    • For those with difficulty quieting the mind, guided relaxation or soft music can help.

Corpse Pose Variations

Explore these variations to deepen your practice:

  • Savasana with Props
    • Add blankets or pillows for added comfort and alignment.
  • Corpse Pose Bass Technique
    • Combine Savasana with bass-heavy music for a grounding effect.
  • Guided Savasana
    • Use a recorded guided relaxation session to assist with mindfulness.

The Role of Corpse Pose in Yoga Teacher Training

Yoga practitioners, especially those undergoing 300 Hour Yoga Teacher Training in Rishikesh or 500 Hour Yoga Teacher Training in Rishikesh, learn that Savasana is more than just relaxation. It’s an essential practice to:

  • Solidify the benefits of active poses.
  • Teach awareness of the breath and body.
  • Transition smoothly from yoga to daily life.

In Rishikesh, the yoga capital of the world, programs emphasize the importance of Savasana Corpse Pose for holistic well-being.


How to Enhance Your Savasana Practice

  • Consistency: Incorporate Savasana at the end of every yoga session.
  • Guidance: Join the Best Yoga Teacher Training in Rishikesh to master techniques
  • Mindfulness: Focus entirely on the present moment during the pose

Conclusion: Embrace the Stillness of Corpse Pose

The Corpse Pose in Yoga is not just about lying down but about surrendering to the present moment. By regularly practicing Savasana Corpse Pose, you’ll experience profound physical and mental relaxation, paving the way for inner peace. Whether you’re a beginner or an advanced yogi, embracing this pose can transform your practice.

So, the next time you roll out your yoga mat, don’t rush through Savasana. Instead, immerse yourself in its simplicity and let it work its magic.

Bakasana

Bakasana (Crane Pose) : Its Benefits, Method, Precaution & Preparation

Bakasana, also known as Crane Pose, is a fundamental arm balance in yoga that strengthens your core, arms and focus. This challenging posture requires dedication and mindfulness, offering physical and mental benefits for practitioners of all levels. In this blog, we’ll explore how to do Bakasana, bakasana pose benefits, variations like Parsva Bakasana and Eka Pada Bakasana and key precautions.

Introduction to Bakasana (Crane Pose)

  • What is Bakasana?
    Bakasana, or Crane Pose, is an arm balance that builds strength, stability, and focus. Its name originates from the Sanskrit words “baka” (crane) and “asana” (pose).
  • What Makes It Unique?
    This pose symbolizes a crane standing tall, emphasizing lightness and grace. Bakasana is integral to yoga traditions, including Ashtanga Yoga and modern practices.
  • Variations in Focus:
    • Parsva Bakasana (Side Crane Pose) adds a twist.
    • Eka Pada Bakasana (One-Legged Crane Pose) enhances balance and strength.

How to Do Bakasana Step-by-Step

Achieving the Bakasana pose requires patience and practice. Follow these steps:

  1. Warm Up: Prepare your wrists, shoulders and core with stretches.
  2. Initial Position: Begin in a squat, keeping feet hip-width apart.
  3. Hand Placement: Place hands shoulder-width apart, fingers spread wide and press firmly into the mat.
  4. Engage Core: Lift your hips as you lean forward, bringing knees onto the back of your upper arms.
  5. Find Your Balance: Shift weight onto your hands, gradually lifting one foot off the ground.
  6. Full Expression: When comfortable, lift both feet and bring them together, engaging your core.
  7. Hold and Breathe: Maintain the pose for 5–10 breaths.

Benefits of Bakasana

  • Physical Strength:
    • Builds arm, wrist and shoulder strength.
    • Engages the core for stability and balance.
  • Flexibility & Openness:
    • Stretches the spine and hips.
    • Improves mobility in wrists and ankles.
  • Mental Focus:
    • Enhances concentration and mindfulness.
    • Cultivates a sense of lightness and grace.
  • Digestive Health:
    • Compresses abdominal organs, stimulating digestion.
  • Stress Reduction:
    • Balancing postures calm the nervous system.

Bakasana Variations to Explore

  • Parsva Bakasana (Side Crane Pose): Adds a lateral twist, engaging obliques and increasing core strength.
  • Eka Pada Bakasana (One-Legged Crane Pose): Requires lifting one leg for added challenge.
  • Bakasana in Ashtanga Yoga: Often included in advanced sequences.
  • Kakasana vs Bakasana: Kakasana (Crow Pose) differs slightly, with bent arms and a lower center of gravity.

Key Precautions for Safe Practice

  • Avoid Overexertion: Don’t push beyond your comfort zone, especially with wrist or shoulder pain.
  • Use Props: Support your feet with blocks if needed.
  • Warm Up Thoroughly: Prepare wrists, shoulders and hips with dynamic stretches.
  • Avoid During Pregnancy: This pose is not recommended for expectant mothers.
  • Focus on Alignment: Ensure proper positioning to avoid strain.

Preparation Poses for Bakasana

  • Plank Pose (Phalakasana): Builds wrist and shoulder strength.
  • Garland Pose (Malasana): Opens the hips and strengthens the lower body.
  • Dolphin Pose: Prepares the shoulders and arms for weight-bearing.
  • Chaturanga Dandasana: Develops arm and core strength.

Training Options in Rishikesh

Deepen your yoga journey with professional guidance at the Best Yoga Teacher Training in Rishikesh. Options include:


Conclusion: The Power of Bakasana

Crow Pose Bakasana is more than a physical challenge—it’s a mental and spiritual journey. This pose encourages strength, flexibility and resilience. Whether exploring Parsva Bakasana or delving into the Bakasana Ashtanga tradition, consistent practice brings transformative benefits.

Incorporating Bakasana into your routine not only enhances your yoga practice but also nurtures mindfulness and self-confidence. Remember, the key to mastering Bakasana how to do is patience, practice and professional guidance.

Embrace this journey with an open heart and consider advancing your skills through a yoga teacher training program in Rishikesh, the yoga capital of the world.

Trikonasana

What Is Trikonasana Or Utthita Trikonasana Or Extended Triangle Pose? – How To Do It, Benefits, Step-By-Step Instruction And Precautions

Trikonasana: A Complete Guide to the Triangle Pose

Looking to enhance your yoga practice? Trikonasana, also known as the triangle pose, offers a perfect blend of strength, flexibility, and balance. This blog explores trikonasana variations, how to perform it, the benefits of trikonasana, and precautions to ensure a safe and effective practice. Whether you’re a beginner or pursuing a 200-hour yoga teacher training course in Rishikesh, this guide is for you.


What is Trikonasana?

  • Meaning: “Trikona” means triangle, and “asana” means pose in Sanskrit. Trikonasana forms a triangle shape with the body
  • Types: Includes utthita trikonasana (extended triangle pose) and parivrtta trikonasana (revolved triangle pose).
  • Found in various yoga sequences, this posture trikonasana images is a staple for improving strength and flexibility

How to Do Trikonasana (Triangle Pose)

  1. Start in Tadasana (Mountain Pose):
    • Stand tall with feet together and arms at your sides
  2. Step Your Foot Back:
    • Take a wide stance, with one foot forward and the other turned outward at a 45-degree angle.
    • Align your heels in one straight line
  3. Extend Your Arms:
    • Raise your arms parallel to the ground, palms facing downward
  4. Side Stretch:
    • Exhale and extend your torso over the front leg, reaching your hand toward your shin, ankle or the floor (without straining)
    • Stretch the opposite arm toward the ceiling, forming a straight line.
  5. Gaze Upward:
    • Look at your raised hand if comfortable or keep your gaze forward to avoid neck strain.
  6. Engage Core and Breathe:
    • Keep your core engaged to maintain stability and breathe deeply for 5–7 breaths.
  7. Release:
    • Inhale to return to standing and repeat on the other side.

Key Trikonasana Variations

  • Utthita Trikonasana (Extended Triangle Pose): A foundational version focusing on lateral stretches.
  • Parivrtta Trikonasana (Revolved Triangle Pose): Incorporates a twist to enhance spinal flexibility.
  • Supported Trikonasana: Use a yoga block for stability if flexibility is limited.

Benefits of Trikonasana

  1. Improves Flexibility:
    • Deep stretches for the hamstrings, calves and hips.
  2. Strengthens Core and Legs:
    • Builds strength in thighs, calves and abdominal muscles.
  3. Enhances Balance and Stability:
    • Requires focus and coordination, improving overall balance.
  4. Stimulates Digestion:
    • The twist in parivrtta trikonasana massages abdominal organs, aiding digestion.
  5. Relieves Back Pain:
    • Lengthens and strengthens the spine, alleviating stiffness and discomfort.
  6. Opens the Chest:
    • Promotes deeper breathing and improves lung capacity.
  7. Reduces Stress:
    • Calms the mind by focusing on balance and breath.
  8. Improves Posture:
    • Engages spinal alignment for a stronger, upright posture.

Difference Between Trikonasana and Utthita Trikonasana

  • Trikonasana: General triangle pose, emphasizing alignment and balance.
  • Utthita Trikonasana: Extended version focusing on deeper lateral stretches.

Both poses are integral to yoga teacher training programs, including the 300-hour yoga teacher training in Rishikesh and 500-hour yoga teacher training in Rishikesh.


Precautions for Trikonasana

  • Avoid if you have severe back, neck or knee injuries.
  • Pregnant individuals should perform this pose with guidance or avoid deep stretches.
  • Use a block or wall for support if you’re new to yoga.

Why Learn Trikonasana in Rishikesh?

Rishikesh is a global hub for yoga enthusiasts. Programs like the 200-hour yoga teacher training course in Rishikesh provide in-depth knowledge of poses like utthita trikonasana and their benefits. Whether you’re exploring yoga for personal growth or professional teaching, Rishikesh offers a holistic learning environment.


Incorporating Trikonasana into Your Practice

To make the most of trikonasana benefits, consider these tips:

  • Practice regularly to enhance flexibility and strength.
  • Combine with poses like Virabhadrasana for a well-rounded sequence.
  • Include mindfulness and breathing techniques for added relaxation.

Conclusion:
Trikonasana is more than a yoga pose; it’s a pathway to improved physical and mental well-being. With consistent practice, you can reap the benefits of this dynamic asana while enhancing your yoga journey. Programs like the Best Yoga Teacher Training in Rishikesh provide the perfect setting to master Trikonasana and its variations. So, roll out your mat, embrace the stretch, and let the triangle pose transform your practice!

Virabhadrasana Pose

What Is Virabhadrasana Warrior Pose 2? – How To Do It, Benefits, Method & Precautions.

Mastering Virabhadrasana Warrior Pose II: A Complete Guide

Are you looking to deepen your yoga practice and cultivate inner strength? Virabhadrasana Warrior Pose II is a powerful and dynamic asana that symbolizes focus, balance and courage. This guide will walk you through the pose, its benefits, and how it connects to broader yoga practices like the 200 Hour Yoga Teacher Training Course in Rishikesh.

Let’s explore the steps, variations and benefits of this transformative pose while naturally incorporating insights into related practices like Virabhadrasana I, Virabhadrasana Yoga Pose and Viparita Virabhadrasana.


What is Virabhadrasana II?

Virabhadrasana II or Warrior Pose II, is named after Virabhadra, the fierce warrior created by Lord Shiva in Hindu mythology. This pose embodies strength, resilience and mental focus.

It is a foundational asana in many yoga sequences taught during programs like the 300 Hour Yoga Teacher Training in Rishikesh.


How to Pronounce Virabhadrasana

If you’re new to yoga, you might wonder, “How to pronounce Virabhadrasana?” Break it down as follows:

  • Vira = Hero
  • Bhadra = Friend or Auspicious
  • Asana = Pose

Step-by-Step Guide to Virabhadrasana II

Follow these steps to practice the Virabhadrasana Yoga Pose safely and effectively:

  1. Start in Tadasana (Mountain Pose):
    • Stand tall with your feet hip-width apart, grounding evenly.
    • Relax your shoulders and engage your core.
  2. Take a Wide Stance:
    • Step one foot back, ensuring your feet are about 3-4 feet apart.
    • Align the front heel with the arch of the back foot.
  3. Adjust Foot Position:
    • Turn the back foot slightly outward (45° angle) while keeping the front foot facing forward.
  4. Bend the Front Knee:
    • Bend your front knee to a 90° angle, ensuring it doesn’t extend beyond the ankle.
    • Keep the back leg straight and strong.
  5. Extend Your Arms:
    • Stretch your arms out to the sides at shoulder height, palms facing down.
    • Reach actively in opposite directions.
  6. Focus Your Gaze:
    • Look over your front fingertips, maintaining a steady gaze for balance.
  7. Hold and Breathe:
    • Stay in the pose for 5-10 deep breaths, feeling the stretch and strength in your body.
  8. Switch Sides:
    • Straighten your front leg and repeat on the opposite side.

Benefits of Virabhadrasana

Physical Benefits

  • Strengthens Lower Body: Builds strength in the legs, glutes and core.
  • Improves Flexibility: Opens the hips, shoulders and chest.
  • Enhances Balance: Develops stability through focused alignment.
  • Boosts Endurance: Holding the pose increases stamina.
  • Tones the Abdomen: Engages and strengthens the core muscles.

Mental Benefits

  • Builds Focus: The gaze point (Drishti) enhances concentration.
  • Promotes Confidence: The posture embodies empowerment and courage.
  • Reduces Stress: Deep breathing in this pose helps calm the mind.

Whether you’re preparing for a 500 Hour Yoga Teacher Training in Rishikesh or practicing at home, the benefits of Virabhadrasana extend to both body and mind.


Precautions and Modifications

To ensure safety while practicing the Virabhadrasana Pose, keep these tips in mind:

  • Avoid if you have knee or hip injuries.
  • Use props like a wall for support if needed.
  • Pregnant practitioners should modify the pose for stability.
Virabhadrasana Pose

Variations of Virabhadrasana

  1. Virabhadrasana I (Warrior Pose I):
  2. Viparita Virabhadrasana (Reverse Warrior Pose):
    • Involves a backbend, stretching the side body and improving flexibility.
  3. Dynamic Flow:
    • Transition between Virabhadrasana I, II and Viparita Virabhadrasana for a flowing sequence.

Why Learn Virabhadrasana in Rishikesh?

Rishikesh, the Yoga Capital of the World, is renowned for its traditional yoga teacher training courses. Programs like the 300 Hour Yoga Teacher Training in Rishikesh offer in-depth guidance on asanas, pranayama, and meditation.

The Best Yoga Teacher Training in Rishikesh emphasizes alignment, breathing, and the philosophy behind poses like Virabhadrasana Yoga Pose.


Tips for Practicing Virabhadrasana

  • Warm up before attempting the pose to avoid strain.
  • Focus on breathing deeply to maintain stability.
  • Practice under a certified teacher, especially if you’re new to yoga or exploring the 500 Hour Yoga Teacher Training in Rishikesh.

Conclusion

Virabhadrasana II is more than just a physical pose; it’s a journey into strength, focus, and balance. By incorporating this powerful asana into your practice, you’ll unlock its profound benefits while preparing for advanced training like the 300 Hour Yoga Teacher Training in Rishikesh.

Take the first step towards mastering the Virabhadrasana Benefits and embracing the warrior within you.

Bhujangasana

Master Bhujangasana (Cobra Pose) – Benefits, Steps & Precautions

Introduction to Bhujangasana

Bhujangasana, also known as Cobra Pose, is a classic yoga posture that enhances strength, flexibility, and vitality. Derived from the Sanskrit words bhujanga (snake) and asana (pose), it resembles the raised hood of a cobra. Bhujangasana is a foundational pose in yoga, offering profound benefits for the body and mind.

Are you ready to unleash your inner strength and flexibility? Bhujangasana, also known as the Cobra Pose, is your gateway to physical vitality and mental tranquility. This empowering yoga pose not only strengthens your spine and opens up your chest but also invites a sense of energy and confidence into your practice. Below is a comprehensive guide to mastering Bhujangasana, exploring its benefits, and understanding essential precautions.


Key Benefits of Bhujangasana

The health benefits of Bhujangasana extend beyond physical fitness. Here’s why this pose is celebrated in yoga:

  • Strengthens the Spine:
    Regular practice builds strength in the back, improving posture and reducing back pain.
  • Enhances Flexibility:
    The stretch opens the chest, shoulders, and abdomen, increasing overall flexibility.
  • Improves Digestion:
    Bhujangasana stimulates abdominal organs, aiding digestion and metabolism.
  • Relieves Stress:
    By opening the heart center, it reduces tension and promotes relaxation.
  • Boosts Circulation:
    Increased blood flow revitalizes the body and enhances energy levels.
  • Supports Posture:
    Practicing Bhujangasana pose counteracts the effects of prolonged sitting.
  • Activates the Endocrine System:
    It stimulates the thyroid and adrenal glands, promoting hormonal balance.

How to Perform Bhujangasana Step-by-Step

Follow these steps to practice Bhujangasana cobra pose safely:

  1. Start in a Prone Position:
    Lie on your stomach with your legs extended and feet hip-width apart.
  2. Place Your Hands:
    Position your palms under your shoulders, elbows close to your body.
  3. Engage the Core:
    Activate your abdominal muscles to protect the lower back.
  4. Lift Gently:
    Inhale and lift your chest, keeping your elbows slightly bent.
  5. Stretch the Neck:
    Lengthen the neck and gaze slightly upward. Avoid overextending.
  6. Hold the Pose:
    Stay for 15–30 seconds, breathing deeply.
  7. Release Gradually:
    Exhale and lower your chest back to the mat.

Bhujangasana Variations

Explore variations like Salamba Bhujangasana (Sphinx Pose), which uses forearm support for beginners. This modification ensures proper alignment and minimizes strain on the back.


Difference Between Bhujangasana and Urdhva Mukha Svanasana

Although similar, these poses have distinct characteristics:

  • Bhujangasana:
    • Lower body remains grounded.
    • Elbows can stay bent.
  • Urdhva Mukha Svanasana (Upward-Facing Dog):
    • Entire body lifts off the mat.
    • Arms are fully extended.

Understanding the difference between Bhujangasana and Urdhva Mukha Svanasana helps in practicing each pose effectively.


Advantages of Bhujangasana for Specific Groups

  • For Beginners:
    Easy to learn and offers quick results for flexibility.
  • For Back Pain:
    A therapeutic option when done under guidance.
  • For Mental Health:
    Reduces anxiety by calming the nervous system.

Precautions While Practicing Bhujangasana

To avoid injuries, keep these tips in mind:

  • Warm up before attempting the pose.
  • Avoid hyperextending your neck or spine.
  • Use support if needed, such as blocks or cushions.
  • Skip this pose if pregnant or recovering from surgery.

Why Learn Bhujangasana in Rishikesh?

Rishikesh, the yoga capital of the world, offers a serene environment to master poses like Bhujangasana. Programs such as the Best Yoga Teacher Training in Rishikesh, 300 Hour Yoga Teacher Training in Rishikesh and 500 Hour Yoga Teacher Training in Rishikesh provide in-depth training on poses, alignment, and breathwork.

For beginners, the 200-hour yoga teacher training course in Rishikesh is an excellent starting point. These courses combine tradition with modern techniques, enhancing your practice.


Conclusion

Bhujangasana is more than just a yoga pose; it’s a gateway to physical vitality and mental clarity. From improving spinal health to enhancing flexibility, the advantages of Bhujangasana are transformative. Whether you’re a beginner or an advanced practitioner, incorporating the Cobra Bhujangasana into your routine can elevate your practice.

Start your journey today and experience the profound benefits of Bhujangasana for yourself!

32-1600x900

Ustrasana/Ushtrasana (Camel Pose): How to Perform, Benefits & Precautions

Introduction to Ustrasana (Camel Pose)

Ustrasana, commonly known as the Camel Pose, is a deeply rejuvenating yoga posture practiced worldwide for its transformative physical and mental benefits. Derived from the Sanskrit words “ustra” (camel) and “asana” (pose), this backbend resembles the curved shape of a camel’s body.

Practiced in traditional yoga routines and modern wellness programs, Ustrasana strengthens, stretches, and balances the body while calming the mind. Whether you’re a yoga enthusiast or a beginner, understanding what Ustrasana is and its benefits can inspire you to include it in your practice.


Benefits of Ustrasana (Camel Pose)

The Ustrasana benefits extend beyond physical health, promoting mental and emotional well-being. Here’s a detailed look:

  • Improves Spine Health
    Regular practice of Ustrasana pose strengthens the back and enhances spinal flexibility. It provides relief from tension and reduces back pain by stretching the vertebrae.
  • Boosts Digestion
    The compression in the abdomen during the pose stimulates digestion and massages internal organs, aiding nutrient absorption and relieving constipation.
  • Opens Chest and Shoulders
    Camel Pose Ustrasana counteracts poor posture by opening tight chest muscles and strengthening shoulders, combating the effects of prolonged sitting.
  • Enhances Flexibility
    From the back to the thighs, Ustrasana camel pose stretches major muscle groups, improving mobility and reducing stiffness over time.
  • Relieves Stress and Anxiety
    This backbend activates the energy centers, promoting a sense of calm. Practicing Ustrasana fosters emotional release and helps alleviate stress and fatigue.
  • Stimulates Endocrine System
    The stretch across the throat area impacts the thyroid gland, helping regulate metabolism and hormonal balance.

These benefits make Ustrasana an essential asana in yoga programs like the Best Yoga Teacher Training in Rishikesh, where students learn its techniques and therapeutic uses.


How to Do Ustrasana Step-by-Step

Follow these steps to safely master the Ustrasana pose:

  1. Start with Preparation
    Kneel on a yoga mat with your knees hip-width apart and thighs perpendicular to the floor. Point your toes backward.
  2. Position Hands
    Place your hands on your lower back with fingers pointing down. Lengthen your spine as you take a deep breath.
  3. Engage Core
    Tuck your tailbone slightly and engage your abdominal muscles to protect your lower back.
  4. Lean Back Gradually
    Lift your chest and begin to arch backward gently. Reach one hand at a time to touch your heels.
  5. Achieve the Full Pose
    Once comfortable, rest both hands on your heels with fingers pointing toward the toes. Keep your head neutral or gently drop it back if your neck allows.
  6. Hold and Breathe
    Stay in the pose for 5–10 breaths, focusing on deep, steady breathing.
  7. Release Safely
    Bring your hands back to your hips one at a time. Slowly rise back to a kneeling position, maintaining spinal alignment.
How to do Ustrasana/Ushtrasana Camel Pose & What's the Benefits - Best Yoga Teacher Training in Rishikesh

Precautions and Modifications

To practice Ustrasana camel pose safely, consider these tips:

  • Warm-Up is Essential
    Perform gentle stretches like Bhujangasana (Cobra Pose) before attempting Ustrasana to prepare your spine.
  • Use Props for Support
    Beginners can use blocks under their hands or a strap for stability.
  • Avoid Overarching
    Keep your core engaged to protect the lower back and avoid collapsing into the pose.
  • Modify for Neck Strain
    If dropping the head back feels uncomfortable, keep your gaze forward to reduce strain.
  • Seek Guidance
    If you’re new, practice under the supervision of a certified yoga teacher, especially in structured programs like a 200-hour yoga teacher training course in Rishikesh.

Why Practice Ustrasana in Rishikesh?

Rishikesh, the yoga capital of the world, is an ideal destination to explore the depths of Ustrasana. Joining programs like the 300 Hour Yoga Teacher Training in Rishikesh or the 500 Hour Yoga Teacher Training in Rishikesh provides a supportive environment to master asanas, pranayama, and meditation.

In these training courses, Ustrasana is taught as part of a holistic curriculum, emphasizing its therapeutic and spiritual aspects.


Conclusion

Ustrasana, or Camel Pose, holds transformative potential for those willing to embrace its challenges. From improving flexibility and digestion to relieving stress, its benefits are multifaceted. By incorporating this pose into your practice and seeking guidance from the Best Yoga Teacher Training in Rishikesh, you can unlock physical vitality and mental clarity.

So, roll out your yoga mat, follow the steps, and discover what Ustrasana is and its benefits for yourself. Whether you’re a beginner or advancing your yoga journey, Ustrasana offers a gateway to strength, openness, and inner peace.

Baddha Konasana

Baddha Konasana (Butterfly Pose): Benefits, Variations, and How to Do It

Introduction to Baddha Konasana (Butterfly Pose)

Baddha Konasana, also known as the Butterfly Pose, is a fundamental yoga posture that enhances flexibility, promotes relaxation, and improves overall well-being. It is a seated pose where the soles of the feet are pressed together while the knees fall outward, resembling the wings of a butterfly.

This pose is widely practiced in various yoga styles, including 200-hour, 300-hour and 500-hour yoga teacher training courses in Rishikesh. It offers a deep stretch for the hips, inner thighs, and groin while calming the mind.

What is Baddha Konasana?

  • “Baddha” means bound, “Kona” means angle, and “Asana” means pose in Sanskrit.
  • It is a seated hip-opening posture commonly used in warm-up sequences.
  • Helps in enhancing flexibility, improving posture, and relieving stress.

Let’s explore the benefits of Baddha Konasana, its variations, and how to perform it correctly.


Benefits of Baddha Konasana (Butterfly Pose)

1. Improves Hip Flexibility

  • Opens up the hip joints and groin, reducing stiffness.
  • Helps those who sit for long hours or engage in activities like running and cycling.

2. Enhances Blood Circulation

  • Encourages blood flow to the lower body, especially the pelvic region.
  • Beneficial for women’s reproductive health.

3. Supports Digestion

  • The posture stimulates the abdominal organs, improving digestion.
  • Helps in reducing bloating and constipation.

4. Relieves Menstrual Discomfort

  • Practicing Baddha Konasana regularly helps ease menstrual cramps.
  • Promotes relaxation in the lower abdominal area.

5. Reduces Stress and Anxiety

  • The pose promotes mindfulness and relaxation.
  • Helps in calming the nervous system, reducing stress levels.

6. Prepares the Body for Childbirth

  • Beneficial for pregnant women as it strengthens the pelvic floor muscles.
  • Encourages flexibility in the lower body, making labor easier.

7. Aids in Sciatic Pain Relief

  • Helps in stretching and strengthening the lower back muscles.
  • Reduces discomfort caused by sciatica.

How to Do Baddha Konasana (Step-by-Step Guide)

Step 1: Find Your Seated Position

  • Sit on a yoga mat with your legs extended straight in front of you.
  • Keep your spine tall and straight.

Step 2: Bring Feet Together

  • Bend your knees and bring the soles of your feet together.
  • Let your knees drop outward, forming a diamond shape.

Step 3: Hold Your Feet

  • Grasp your feet or ankles with both hands.
  • Keep your shoulders relaxed and back straight.

Step 4: Engage Your Core and Lengthen the Spine

  • Take a deep breath in and straighten the spine.
  • Press your knees gently toward the ground.

Step 5: Lean Forward (Optional)

  • If comfortable, fold forward slightly while keeping your back straight.
  • Hold this position for 5-10 deep breaths.

Step 6: Release the Pose

  • Slowly return to an upright position.
  • Extend your legs forward and shake them out gently.

Supta Baddha Konasana (Reclining Butterfly Pose)

Supta Baddha Konasana, or the Reclining Butterfly Pose, is a restorative variation of Baddha Konasana.

How to Do Supta Baddha Konasana

  1. Lie down on your back with legs extended.
  2. Bend your knees and bring the soles of your feet together, letting the knees drop outward.
  3. Place your arms by your sides with palms facing up.
  4. Breathe deeply and hold the pose for 3-5 minutes.
  5. To exit, gently bring the knees together and straighten the legs.

Benefits of Supta Baddha Konasana

  • Deeply relaxes the body and mind.
  • Reduces stress, anxiety and fatigue.
  • Helps in better digestion and circulation.

Baddha Konasana Variations

1. Baddha Konasana with Forward Fold

  • Enhances the stretch in the lower back and hips.

2. Supta Baddha Konasana (Reclined Variation)

  • Provides a deeper sense of relaxation.

3. Butterfly Pose with Blocks

  • Placing yoga blocks under the knees offers extra support.

4. Butterfly Pose with Strap

  • Helps beginners maintain posture and alignment.

Precautions and Contraindications

Who Should Avoid This Pose?

People with severe knee or hip injuries.
Those experiencing sciatic pain should practice cautiously.
Pregnant women should consult a certified yoga instructor before attempting.

Important Tips

✔️ Do not force the knees to touch the ground.
✔️ Keep the spine straight to avoid lower back strain.
✔️ Use props like blocks or cushions if needed.
✔️ Perform on an empty stomach for best results.


Best Yoga Teacher Training in Rishikesh

Rishikesh is known as the Yoga Capital of the World and offers world-class yoga teacher training programs:

1. 200 Hour Yoga Teacher Training Course in Rishikesh

  • Perfect for beginners looking to build a strong foundation.

2. 300 Hour Yoga Teacher Training in Rishikesh

  • Ideal for those who have completed the 200-hour course and want to deepen their practice.

3. 500 Hour Yoga Teacher Training in Rishikesh

  • A comprehensive program for advanced practitioners and aspiring yoga teachers.

These training programs not only teach traditional yoga postures like Butterfly Pose and Supta Baddha Konasana Pose but also cover philosophy, anatomy, and meditation techniques.


Conclusion: Why You Should Practice Baddha Konasana

Baddha Konasana is a powerful yet simple pose that enhances flexibility, boosts circulation and promotes relaxation. Whether you are a beginner or an advanced yogi, this pose can bring significant benefits when practiced regularly.

By incorporating Baddha Konasana variations, such as Supta Baddha Konasana, you can experience deeper relaxation and improved posture.

If you are passionate about yoga, consider enrolling in the Best Yoga Teacher Training in Rishikesh to deepen your knowledge and teaching skills.

So, spread your wings with Baddha Konasana Butterfly Pose and embrace the journey of yoga!

Dhanurasana

Dhanurasana or Bow Pose : How to to Do it, Benefits, Step by Step Instructions & Precaution

Dhanurasana, also known as the Bow Pose, is a powerful yoga posture that offers a deep stretch to the body while improving flexibility, strength, and balance. This backbend pose resembles an archer’s bow, making it a unique and dynamic asana in yoga practice.

In this article, we’ll explore:

  • What is Dhanurasana?
  • Benefits of Bow Pose
  • Step-by-step guide on how to do Dhanurasana
  • Precautions and contraindications

If you’re looking to enhance your yoga practice or train with the Best Yoga Teacher Training in Rishikesh, this guide will help you master Bow pose safely and effectively.


What is Dhanurasana?

Dhanurasana, or Bow Pose, derives its name from the Sanskrit words:

  • “Dhanu” meaning bow
  • “Asana” meaning posture

This asana has been widely mentioned in ancient yoga texts like the Hatha Yoga Pradipika and Gheranda Samhita, highlighting its importance in traditional yoga practice.

There are different variations of this pose, including Upward Bow Pose, which is a deeper backbend that requires advanced flexibility and strength.

Regular practice of bow pose enhances spinal flexibility, strengthens muscles, and stimulates internal organs, making it a must-have in any yoga routine.


Benefits of Dhanurasana

The benefits of Bow Pose extend beyond physical well-being—it also contributes to mental clarity and relaxation. Here’s why you should include this asana in your practice:

1. Strengthens Back and Core Muscles

  • Engages the spine, shoulders, and abdomen, enhancing posture and relieving back pain.
  • Improves flexibility and strengthens the lower back muscles.

2. Enhances Digestion

  • The compression on the abdominal area massages internal organs, aiding better digestion.
  • Helps reduce symptoms of constipation and bloating.

3. Improves Spinal Flexibility

  • Regular practice increases spinal mobility and flexibility, making movements more fluid.
  • Beneficial for those with a sedentary lifestyle or desk jobs.

4. Stimulates Reproductive Organs

  • Increases blood circulation to reproductive organs, improving their functionality.
  • Beneficial for individuals facing menstrual discomfort or hormonal imbalances.

5. Boosts Energy and Relieves Stress

  • Opens up the chest and stimulates the heart chakra, helping to release emotional tension.
  • Acts as a natural stress reliever by reducing cortisol levels.

6. Supports Weight Loss

  • Helps burn excess fat in the abdomen and thighs, leading to a toned body.
  • Regular practice, combined with a healthy lifestyle, supports weight management.

If you want to deepen your yoga knowledge, consider enrolling in a 300 Hour Yoga Teacher Training in Rishikesh to refine your practice.


Step-by-Step Guide: How to Do Dhanurasana

Mastering Dow Pose pose requires patience and practice. Follow these steps carefully:

1. Preparation

  • Lie flat on your stomach with your legs hip-width apart.
  • Keep your hands resting beside your body, palms facing upward.

2. Lift Your Legs and Arms

  • Bend your knees and bring your feet towards your buttocks.
  • Reach back with both hands and hold your ankles firmly.

3. Engage Your Core

  • Inhale deeply and lift your chest and thighs off the mat.
  • Keep your gaze forward and maintain a steady breath.

4. Deepen the Stretch

  • Push your feet against your hands to create a deeper arch.
  • Keep your shoulders relaxed and avoid straining your neck.

5. Hold and Breathe

  • Maintain the pose for 15-20 seconds, breathing deeply.
  • Focus on stability and balance to prevent unnecessary strain.

6. Release the Pose

  • Exhale slowly and release your grip on the ankles.
  • Lower your chest, thighs, and feet back to the mat.
  • Rest in Makarasana (Crocodile Pose) to relax the body.

For those aiming for an advanced level, try Chakrasana or Urdhva Dhanurasana to further enhance flexibility.


Precautions and Contraindications

While Bow Pose has several benefits, it’s essential to practice it safely. Here are some key precautions:

1. Avoid If You Have Any Medical Conditions

  • Individuals with spinal injuries, heart conditions, high blood pressure or recent surgeries should avoid this pose.
  • Pregnant women should NOT perform this asana.

2. Warm-Up Properly

  • Before attempting Bow pose, perform basic warm-up poses like Bhujangasana (Cobra Pose) and Salabhasana (Locust Pose).
  • This helps prevent injuries and improves flexibility.

3. Don’t Force the Stretch

  • If you experience pain or discomfort, ease off the pose.
  • Avoid jerky movements and focus on gradual progress.

4. Practice Under Expert Guidance


Conclusion

Dhanurasana is a transformative yoga pose that enhances flexibility, strength, and overall well-being. With regular practice, you can experience the benefits of Dhanurasana while ensuring proper precautions.

If you’re passionate about deepening your yoga journey, consider enrolling in a 200 Hour Yoga Teacher Training Course in Rishikesh, where you can learn from experienced instructors.

Embrace the power of Bow Pos and unlock the full potential of your yoga practice!