Vrikshasana

Vrikshasana (Tree Pose): Benefits, Step-by-Step Guide, and Precautions

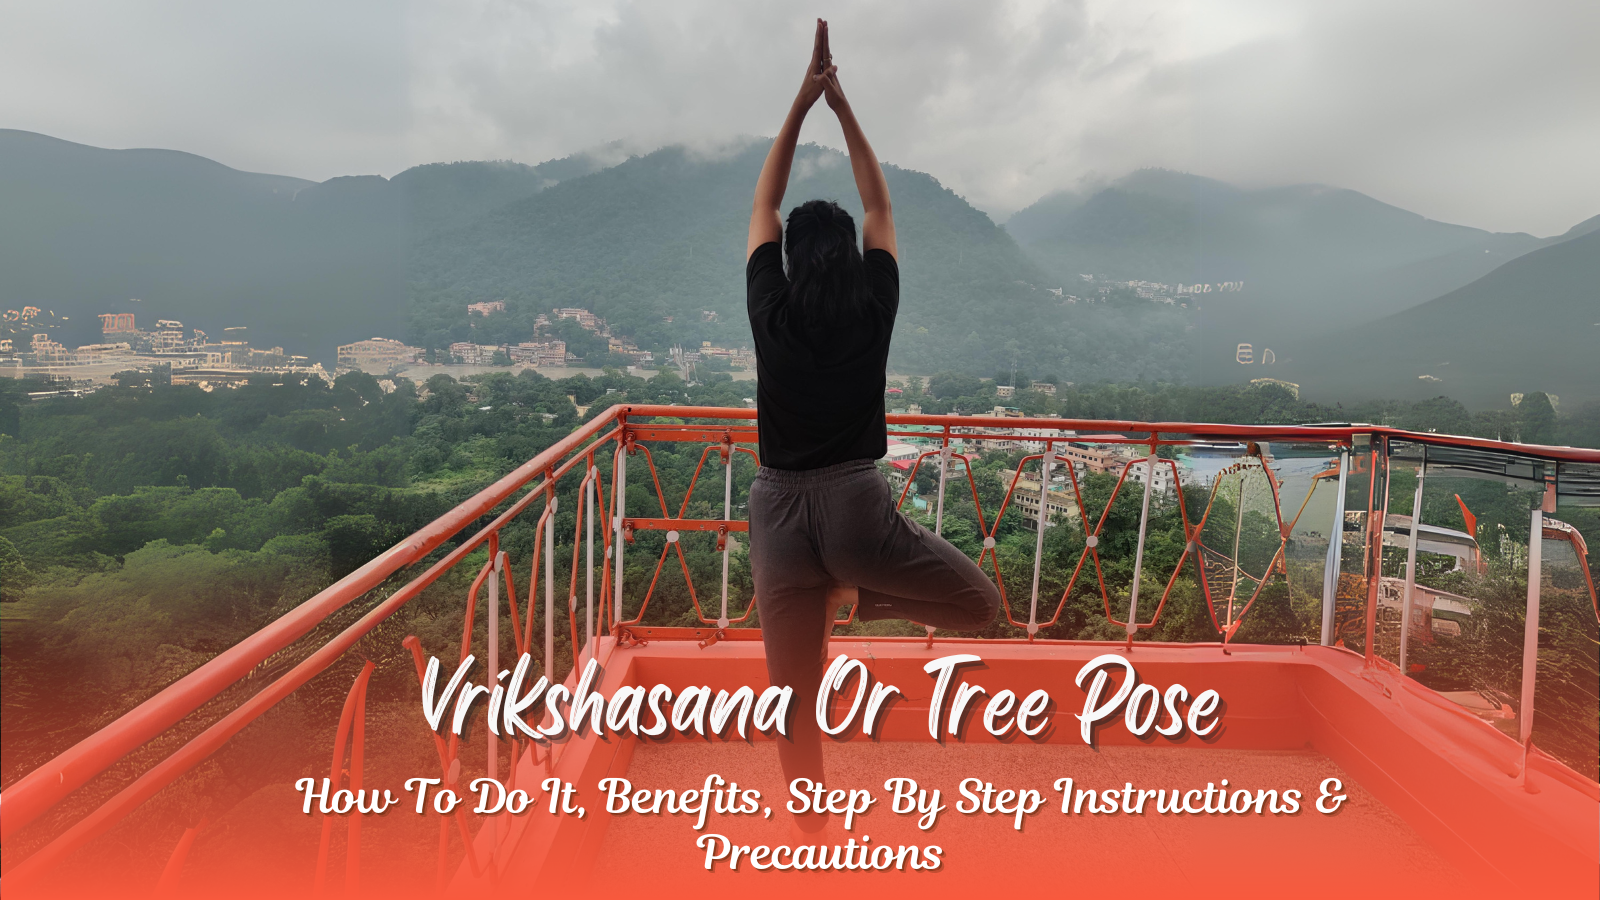
Introduction of Vrikshasana

Vrikshasana, also known as Tree Pose, is a widely practiced yoga posture that imitates the steady balance of a tree. With its grounding nature and numerous benefits for the body and mind, it has become an essential pose for yoga enthusiasts of all levels. Whether you are looking to improve balance, strength, flexibility, or focus, Vrikshasana can be your go-to asana.

In this article, we’ll explore the benefits of Vrikshasana, how to do it step by step, and provide essential tips for beginners. Plus, we’ll look at its impact on mental health and share important precautions to keep in mind.


What is Vrikshasana?

The name Vrikshasana comes from the Sanskrit words “vriksha” (tree) and “asana” (pose), making it the “Tree Pose.” This standing balance posture is designed to help you feel rooted and grounded, just like a tree with its deep roots in the earth.

Vrikshasana is a beginner-friendly yet powerful yoga pose that enhances your physical and mental strength. Its combination of balance, concentration, and flexibility brings you closer to achieving inner peace and stability.


How to Do Vrikshasana Step by Step

Vrikshasana Pose involves balancing on one leg while placing the opposite foot on your inner thigh or calf, aligning your body like the trunk of a tree. Here’s how to do Vrikshasana step by step:

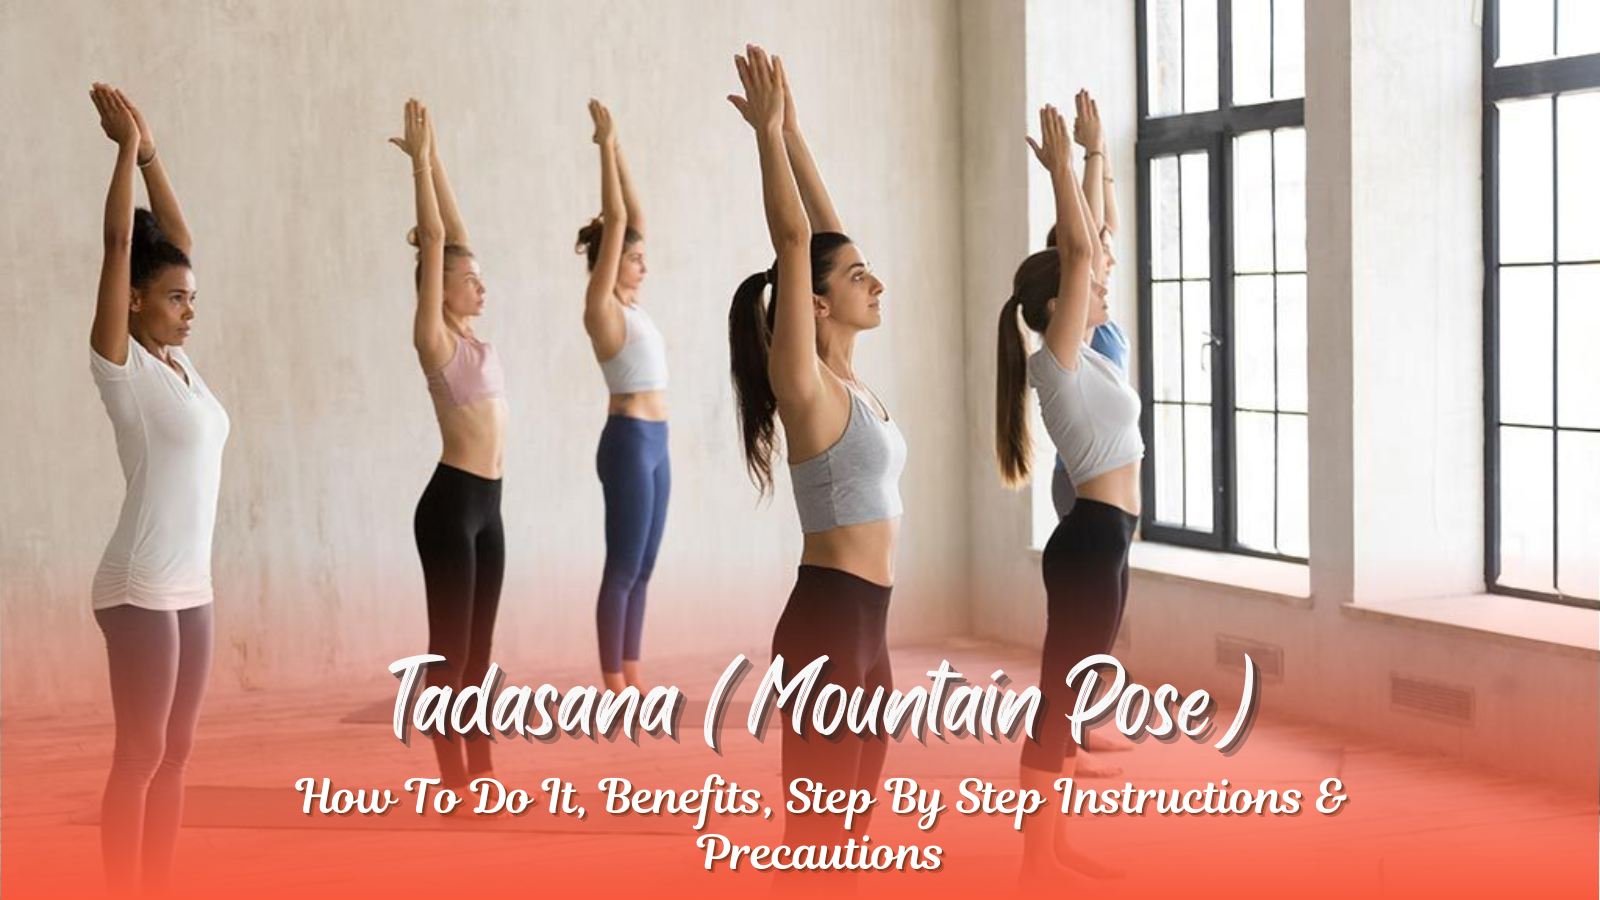
  1. Start in Tadasana (Mountain Pose): Stand tall with your feet hip-width apart and arms by your sides. Take a few deep breaths to center yourself.
  2. Shift Your Weight: Begin by transferring your weight to your right leg, then lift your left foot off the ground.
  3. Place the Foot on Your Inner Thigh or Calf: Avoid placing your foot directly on your knee. If balance is challenging, place your foot lower or just touch the ground for support.
  4. Find Your Balance: Once stable, bring your hands to a prayer position (Namaste) in front of your chest or stretch them upward towards the sky.
  5. Focus and Breathe: Fix your gaze on a point in front of you to maintain balance. Keep your core engaged, and breathe deeply.
  6. Hold for 30 Seconds to 1 Minute: Maintain the pose, keeping your posture steady and balanced.
  7. Release and Switch Sides: To exit the pose, gently release one hand and lower your foot. Repeat on the opposite leg.

Benefits of Vrikshasana (Tree Pose)

Vrikshasana benefits go beyond just improving balance. Practicing this pose regularly offers a variety of physical, mental, and emotional advantages. Here are some key benefits of Vrikshasana:

  • Improves Balance and Posture: By standing on one leg, you activate core muscles and improve overall posture. Regular practice helps correct postural imbalances, particularly for those who spend a lot of time sitting.
  • Strengthens Leg Muscles: This pose works the legs, specifically the thighs, calves, and ankles, improving muscle strength and endurance.
  • Increases Focus and Concentration: Since balance requires mental focus, practicing Vrikshasana improves your ability to concentrate, not only on the mat but also in daily life.
  • Opens the Hips and Groin: A deep stretch in the hips and groin helps relieve tension and tightness, making this pose beneficial for those with a sedentary lifestyle.
  • Relieves Stress and Anxiety: This grounding pose calms the mind, reduces stress, and brings a sense of inner peace by connecting you with the earth’s energy.
  • Cultivates Gratitude: Visualizing yourself as a resilient tree can inspire gratitude for your own growth and personal journey, fostering a positive mindset.

Precautions for Vrikshasana

As with any yoga pose, there are certain precautions to take when practicing Vrikshasana to avoid injury and ensure a safe practice. Here are some tips to keep in mind:

  • Warm-up Properly: Always warm up before attempting Vrikshasana. A good warm-up helps prevent strain and improves flexibility.
  • Choose a Stable Surface: Make sure you practice on a flat, non-slippery surface to prevent slipping and losing balance.
  • Don’t Force the Pose: Start with the basic version of Vrikshasana and gradually progress as your balance and flexibility improve. Avoid pushing your body too hard.
  • Use Props for Support: If balancing is difficult, use props like a wall or chair for support. You can gradually move away from these aids as your confidence grows.
  • Avoid If Injured: If you have any knee, ankle, or hip injuries, or other conditions that could be aggravated by standing on one leg, avoid this pose until you’re fully healed.
  • Avoid Locking Joints: Never lock your standing knee; keep it slightly bent to prevent unnecessary pressure on the joints.
  • Keep Breathing Smoothly: Focus on your breath and maintain a calm, steady inhale and exhale throughout the pose to avoid dizziness or loss of balance.

Vrikshasana and Yoga Teacher Training

If you’re looking to deepen your yoga practice or become a certified instructor, consider enrolling in one of the best Yoga Teacher Training Programs in Rishikesh. Rishikesh, the yoga capital of the world, offers a wide variety of courses that can help you grow both physically and spiritually.


Conclusion

Vrikshasana or Tree Pose is an incredible yoga posture that offers multiple benefits for your body and mind. It strengthens your muscles, improves your balance, and helps cultivate a sense of peace and gratitude. By following the step-by-step guide above and practicing with patience, you can enjoy the rewards of this grounding pose.

If you’re considering expanding your yoga practice further, enrolling in one of the best yoga teacher training courses in Rishikesh can provide you with the tools and knowledge to elevate your practice and teach others the transformative benefits of yoga.

Naukasana

Navasana Or Naukasana (Boat Pose): How To Do It, Benefits, Step By Step Instructions & Precautions

Are you ready to strengthen your core and improve your balance? Look no further than Navasana (also known as Naukasana or Boat Pose). This powerful yoga pose engages multiple muscles, offers incredible benefits, and enhances both physical and mental well-being. In this article, we will dive into the steps, variations, and benefits of Navasana, as well as provide you with useful tips for beginners and those seeking deeper insights into this yoga pose.


What is Navasana in Yoga?

Navasana (or Naukasana) is a yoga pose that resembles the shape of a boat, which is why it’s commonly called Boat Pose. It requires balance, strength, and concentration, making it an excellent asana for building a toned core. The word “Nava” means boat in Sanskrit, and “Asana” refers to pose. This asana is typically performed by sitting on the floor, lifting the legs while maintaining a V-shape, and engaging the core to hold the position.

Navasana Yoga: Benefits for the Body and Mind

Navasana or Naukasana has numerous benefits for both your body and mind. By regularly practicing Boat Pose, you can experience the following advantages:

  • Strengthens Core Muscles:
    One of the most significant Naukasana benefits is its ability to strengthen the core muscles, including the abdominals, back muscles, and pelvic floor. A strong core helps with balance, stability, and injury prevention.
  • Improves Digestion:
    The gentle pressure applied on the abdomen in Navasana stimulates digestive organs, helping to improve digestion and relieve issues like bloating or constipation.
  • Tones Leg Muscles:
    While Navasana primarily targets the core, it also tones the quadriceps, hamstrings, calves and hip flexors. These leg muscles engage to help maintain the pose, promoting flexibility and strength.
  • Reduces Stress & Anxiety:
    Navasana yoga requires focus and deep breathing. This helps activate the parasympathetic nervous system, reducing stress levels and promoting calmness.
  • Boosts Energy Levels:
    Practicing Navasana activates the Manipura Chakra (solar plexus), which is linked to vitality and energy. This helps boost energy levels, keeping you active throughout the day.
  • Improves Balance & Posture:
    Maintaining proper form in Navasana strengthens body alignment and enhances overall posture, which improves balance and reduces the risk of falls.

Step-by-Step Instructions for Navasana or Naukasana (Boat Pose)

If you’re ready to add Navasana into your practice, follow these step-by-step instructions to perform the pose correctly:

  1. Start Sitting: Sit on your mat with your legs stretched out in front of you and your feet together.
  2. Place Your Hands: Put your hands next to your hips, fingers pointing towards your feet.
  3. Inhale and Engage Core: Take a deep breath in, engaging your abdominal muscles.
  4. Lift Your Legs: Gradually lift both legs off the floor while keeping them straight, forming a V-shape. Point your toes towards the ceiling.
  5. Straighten Your Back: Keep your back straight and avoid rounding your spine.
  6. Extend Your Arms: Stretch both arms out in front of you, parallel to the floor, in line with your shoulders.
  7. Balance on Your Sit Bones: Keep your focus on balancing on your sit bones (the bony protrusions at the base of your pelvic bone).
  8. Maintain the Position: Hold this position for 30-60 seconds while breathing steadily.
  9. Release Slowly: To exit the pose, slowly lower your legs and return to the starting position while exhaling.

Variations of Navasana (Boat Pose)

While Navasana is an excellent pose for core strength, there are several variations and modifications to make it more accessible for beginners or those seeking a challenge:

  • Half Boat Pose (Ardha Navasana):
    In this variation, bend your knees and keep your feet flat on the floor. Lift one leg at a time, keeping the other leg on the ground. This is a good modification for beginners or those needing extra support.
  • One-Legged Boat Pose (Single-Legged Navasana):
    Extend one leg parallel to the ground while keeping the other leg bent. This variation targets your core and leg muscles, making the pose more intense.
  • Upward Plank Pose (Poorvottanasana) Variation:
    For an upper-body challenge, try this variation by starting in Dandasana (Staff Pose) and lifting your hips off the ground. Engage your arms and core to hold the position.

Modifications for Beginners or Those with Injuries

If you’re a beginner or dealing with an injury, here are some modifications and precautions to ensure a safe and effective practice:

  • Use Props:
    You can place a bolster or pillow under your knees to provide support if you find it challenging to keep your legs lifted.
  • Support Your Thighs:
    Hold onto your thighs if you’re struggling to maintain balance in Navasana. This extra support can help build strength gradually.
  • One Leg on the Floor:
    If lifting both legs off the ground is too challenging, start by keeping one leg on the floor while extending the other leg straight out.
  • Listen to Your Body:
    Always listen to your body. If you experience discomfort or pain, stop immediately and try a modification.

Related Yoga Practices to Complement Navasana

In addition to Navasana, there are other variations of boat poses that can complement your practice:

  • Paripurna Navasana (Full Boat Pose): This is the full version of Navasana, where you maintain a perfect V-shape, lifting both legs and arms in unison.
  • Ardha Navasana (Half Boat Pose): This modification involves bending your knees to reduce the intensity while still working on the core and balance.

Yoga Training Courses in Rishikesh

If you’re looking to deepen your practice of Navasana and other yoga poses, consider enrolling in a 200 Hour Yoga Teacher Training Course in Rishikesh or take it further with 300 Hour Yoga Teacher Training in Rishikesh or 500 Hour Yoga Teacher Training in Rishikesh. These courses are perfect for anyone looking to learn more about yoga asanas, alignment, anatomy, and the philosophy behind yoga. Rishikesh, known as the Yoga Capital of the World, offers the perfect environment for deepening your yoga journey.


Conclusion: Reap the Benefits of Navasana (Boat Pose)

Incorporating Navasana or Naukasana into your yoga practice can provide numerous benefits, including improved core strength, balance, digestion, and mental clarity. By following the correct steps, variations, and modifications, you can master this powerful yoga pose and enjoy its rewards. Whether you’re a beginner or a seasoned practitioner, Boat Pose offers something for everyone. Try it today and experience the profound impact it has on your body and mind.

Halasana

Halasana Or Plough Pose : How To Do It, Benefits, Instructions & Precautions

Halasana Pose: Everything You Need to Know

If you’re looking to enhance your yoga practice, the Halasana pose, also known as the Plough Pose, is a fantastic addition. This intermediate-level inversion yoga pose offers a deep stretch, strengthens various muscle groups, and provides mental relaxation. In this blog, we will dive into the benefits, step-by-step guide, and precautions for performing Halasana effectively.

What is Halasana?

Halasana, or the Plough Pose, derives its name from the Sanskrit words hala meaning “plow” and asana meaning “pose.” It mimics the shape of a traditional Indian plow, hence the name.

This yoga pose involves a deep backbend, requiring flexibility in the spine, shoulders, arms, and hamstrings. It is an excellent pose for stretching and toning the entire body, especially the back and core. Though it may seem challenging at first, with consistent practice, it can be mastered, offering incredible benefits for both the body and mind.

Benefits of Halasana

The Halasana yoga pose is more than just a physical stretch. Here are some of the many benefits of Halasana:

  • Stretches the Spine: This yoga pose stretches the spine, providing relief from tension caused by long hours of sitting or poor posture. It promotes spinal flexibility, improving mobility.
  • Stimulates Digestion: The compression on the abdomen while performing Halasana massages internal organs, enhancing digestion, nutrient absorption, and waste elimination.
  • Relieves Stress: As an inversion pose, Halasana helps increase blood circulation to the brain. This boost in blood flow triggers the release of endorphins, promoting relaxation and reducing stress levels.
  • Tones the Abdominal Muscles: The Halasana position engages the abdominal muscles, helping to strengthen and tone the core, especially the obliques and transverse abdominis.
  • Improves Flexibility: This pose increases the flexibility of the spine, hamstrings, and shoulders, making it beneficial for overall body mobility.
  • Calms the Mind: Halasana induces a calming effect on the nervous system, reducing anxiety and promoting a sense of peace.

Step-by-Step Guide: How to Perform Halasana

Here’s a detailed, step-by-step guide to help you master the Halasana pose:

  1. Starting Position: Begin by lying flat on your back with your arms by your sides, palms facing down. Keep your feet together and your body relaxed.
  2. Lift Your Legs: Inhale deeply and lift both legs toward the ceiling, keeping them straight. Your body should form a 90-degree angle from the floor. Engage your core to support the lift.
  3. Lower Legs Behind You: As you exhale, slowly lower your legs over your head, bringing them to the floor behind you. Keep your knees straight. The goal is to touch the ground with your feet, but if this isn’t possible initially, aim to get as close as you can.
  4. Support Your Back: For extra support, place your hands on the floor beside you or interlace your fingers behind your back. If you’re more advanced, keep your arms straight to deepen the stretch.
  5. Hold the Position: Breathe deeply and hold the position for 15-30 seconds, focusing on relaxing your neck and shoulders.
  6. Coming Out of the Pose: To release, gently roll your spine down onto the mat, vertebra by vertebra, until you return to the starting position.

Precautions While Practicing Halasana

While Halasana offers numerous advantages, it’s important to be mindful of some precautions:

  • Warm-Up: Before attempting Halasana, warm up your body with stretches that focus on your back, legs, and shoulders to prevent injury.
  • Avoid Jerky Movements: Move into and out of the pose slowly. Sudden movements can strain the neck, shoulders, and spine.
  • Listen to Your Body: Halasana can be intense, especially if you’re a beginner. If you feel any discomfort or pain, ease out of the pose immediately.
  • Props for Support: If you find Halasana challenging, you can place a folded blanket or yoga block under your shoulders for extra support.
  • Avoid During Menstruation: Women should avoid Halasana during menstruation, as inverted poses can disrupt the natural flow of blood.
  • Don’t Force the Pose: Halasana requires flexibility in your spine and hamstrings. Don’t force your body to reach the full expression of the pose. Over time, your flexibility will improve, and the pose will become easier.
  • Seek Professional Guidance: If you’re new to yoga or have medical conditions, it’s best to consult a certified instructor for proper form and adjustments.

Ardha Halasana: A Modified Version

For beginners or those with limited flexibility, Ardha Halasana (Half Plough Pose) is a great alternative. In this modified version, instead of bringing your legs all the way to the floor, you only lower them halfway. This version still provides many of the benefits, including stretching the spine and toning the core.

Does Halasana Reduce Belly Fat?

While Halasana does engage the abdominal muscles, it is not specifically designed to target belly fat. However, when practiced regularly, it contributes to overall fat loss as part of a balanced fitness routine. Combining Halasana with a healthy diet and other fat-burning exercises can help reduce belly fat over time.

Why Choose Yoga Teacher Training in Rishikesh?

If you’re looking to deepen your yoga practice and learn how to teach poses like Halasana, Rishikesh offers some of the best Yoga Teacher Training programs globally. Rishikesh is known as the “Yoga Capital of the World,” attracting yoga practitioners and teachers from all over.

Conclusion

Incorporating Halasana (Plough Pose) into your yoga practice can bring incredible physical and mental benefits, including improved flexibility, stress relief, and a toned core. Whether you’re a beginner or an experienced yogi, Halasana is a pose worth adding to your routine. Remember to practice with caution, listen to your body, and gradually work towards perfecting the pose. And, if you’re interested in advancing your yoga journey, consider enrolling in one of the best Yoga Teacher Training programs in Rishikesh to deepen your understanding and skills.

Garudasana

Garudasana (Eagle Pose) : How To Do It, Benefits, Step By Step Instructions & Precautions

Garudasana, commonly known as Eagle Pose, is a powerful standing yoga posture that requires balance, flexibility, and concentration. This pose offers numerous benefits for the body and mind, helping to improve both physical strength and mental focus. In this guide, we’ll explore how to perform Garudasana, its benefits, and how it can elevate your yoga practice. If you’re also looking to deepen your yoga knowledge, consider enrolling in the Best Yoga Teacher Training in Rishikesh, with options such as the 300 Hour Yoga Teacher Training in Rishikesh or the 500 Hour Yoga Teacher Training in Rishikesh.

What is Garudasana (Eagle Pose)?

Garudasana is derived from the Sanskrit word Garuda, which refers to the eagle and Asana, which means pose. Just like an eagle soaring high in the sky, this pose symbolizes strength, grace, and sharp focus. By practicing Garudasana, you align your body and mind, achieving a sense of stability and calm. As you move through the pose, you’re not just working on your body; you’re also honing your mental clarity.

Step-by-Step Guide to Garudasana (Eagle Pose)

To fully experience the benefits of Eagle Pose, follow these simple steps to correctly execute the pose:

  1. Start Standing Tall: Stand with your feet hip-width apart and focus on a point in front of you to help with balance.

  2. Cross Your Right Leg Over Left: Lift your right leg and cross it over your left thigh. If possible, hook your right foot behind the left calf.

  3. Bend Your Left Knee: Slightly bend your left knee to stabilize your body while balancing on one leg.

  4. Engage Your Arms: Extend your arms forward and cross your right arm over your left at the elbows. Bend your arms so your palms face each other.

  5. Bring Palms Together: If possible, press your palms together. Keep your shoulders aligned with your hips and your gaze steady.

  6. Hold and Breathe: Focus on your breath, maintaining this position for a few breaths before gently releasing.

  7. Repeat on the Other Side: Switch legs and arms, repeating the steps.

Garudasana Benefits for the Body and Mind

Garudasana is not only beneficial for flexibility but also helps in improving strength, balance, and focus. Let’s break down the Garudasana benefits in detail:

  • Improves Balance and Stability: By balancing on one leg and crossing the other leg, you enhance your sense of coordination and body control.

  • Increases Flexibility: This pose stretches the hips, thighs, back, ankles, and shoulders, helping to increase flexibility in these areas.

  • Strengthens Core and Legs: The muscle engagement in the standing leg and core muscles helps build strength and stability.

  • Improves Digestion: The twisting nature of the pose stimulates the digestive system, aiding in better digestion and detoxification.

  • Calms the Mind: The focus required in Garudasana helps to clear mental clutter and reduce stress, making it a great pose for mental clarity.

  • Enhances Concentration: Holding the pose with focus and steady breathing helps develop concentration and mental discipline.

Garudasana Chakra Connection

Garudasana is known to activate the solar plexus chakra (Manipura), located in the upper abdomen. This chakra is associated with personal power, self-esteem, and confidence. By practicing Eagle Pose, you stimulate this chakra, enhancing your ability to manifest personal goals and build inner strength. Regular practice can help you connect with your personal power, aligning you physically and mentally.

Garudasana Mythology and Symbolism

In Hindu mythology, Garuda is a divine bird and the mount of Lord Vishnu. Known for his speed and strength, Garuda represents the power of transformation. By embodying Garudasana, you tap into this transformative energy, gaining the strength and focus to overcome obstacles, just like Garuda did when he rescued his mother from the serpent king.

Key Benefits of Garudasana Eagle Pose

The Garudasana Eagle Pose benefits are numerous, impacting both the body and the mind. Regular practice can lead to the following:

  • Strengthen your legs, ankles, and core: These areas are key to maintaining balance during the pose, and strengthening them provides better overall stability.

  • Improves posture: The pose encourages proper alignment of the spine and opens the chest, promoting better posture.

  • Detoxifies and rejuvenates: The twist in Garudasana aids in detoxification and increases energy flow in the body.

  • Reduces stress: Focus and breathing techniques while in the pose help calm the nervous system and reduce anxiety.

To make the most out of Garudasana and avoid injury, follow these tips:

Tips for a Safe Practice of Garudasana

Incorporating Garudasana into Your Yoga Practice

  1. Warm-Up Properly: Before attempting Garudasana, warm up your body with gentle stretches and poses such as Sun Salutations.

  2. Start Slow: If you’re a beginner, don’t rush into the full expression of Garudasana. Start by practicing the basic balance and progressively deepen your stretch.

  3. Engage Your Core: Properly engage your core muscles to maintain balance and prevent strain on your back.

  4. Focus on Alignment: Ensure your knees are aligned with your ankles and your hips are stacked over your shoulders.

  5. Use Props for Support: If you’re still building strength and flexibility, use props such as blocks or straps to help you get into the pose safely.

  6. Avoid Overstretching: Never force yourself into the pose. Gradually increase your flexibility with time and practice.

Garudasana is a valuable addition to any yoga sequence, especially for those working on improving balance, flexibility, and mental focus. To incorporate it effectively into your routine, you can pair it with other poses such as Warrior I (Virabhadrasana I) and Tree Pose (Vrikshasana) for a balanced flow. Remember, consistency is key in yoga practice, and with time, you’ll feel more comfortable and stable in this pose.

If you’re looking to deepen your yoga journey and teach this powerful pose to others, enrolling in a 200 Hour Yoga Teacher Training Course in Rishikesh can provide you with the skills and knowledge to guide students in their practice. The teachings from this course will not only improve your personal practice but will also empower you to teach others effectively.

Conclusion: Mastering Garudasana for Strength and Balance

Garudasana is a challenging yet rewarding pose that can greatly enhance your yoga practice. Whether you’re looking to improve your balance, flexibility, or mental clarity, this pose offers incredible benefits for both the body and mind. As you integrate Garudasana into your routine, take your time, practice consistently, and remember to listen to your body.

For those looking to deepen their yoga knowledge and practice, enrolling in the Best Yoga Teacher Training in Rishikesh can help you master Garudasana and many other asanas. Whether you choose a 300 Hour Yoga Teacher Training in Rishikesh or a 500 Hour Yoga Teacher Training in Rishikesh, you’ll be equipped with the skills to teach and practice yoga with confidence.

With patience and dedication, you can master Garudasana, connecting with the energy of the eagle and transforming both your body and mind.


By incorporating Garudasana into your yoga practice and exploring its benefits, you’ll experience a deeper connection with your body and mind. Consider joining a Yoga Teacher Training in Rishikesh to further enhance your practice and knowledge.

Tadasana

Tadasana (Mountain Pose): How To Do It, Benefits, Step By Step Instructions & Precautions

Tadasana, also known as the Mountain Pose, is a foundational yoga asana that serves as the starting point for many standing poses. Despite its simplicity, Tadasana offers numerous physical and mental benefits. This powerful pose helps align the body and encourages mindfulness, making it ideal for practitioners at all levels. In Sanskrit, the word “Tada” means “mountain” symbolizing stability and stillness—qualities embodied in the Mountain Pose.

What is Tadasana (Mountain Pose)?

Tadasana is a standing yoga pose where the body is aligned in a straight line from head to toe, creating a sense of grounding. This pose is often used as a starting position for other standing yoga poses and can be practiced by beginners as well as experienced yogis.

Tadasana Benefits:

The Mountain Pose offers a variety of physical and mental benefits. Here are some of the key advantages:

  • Strengthens the Legs:
    • Practicing Tadasana regularly helps strengthen the muscles of the thighs, knees, and calves.
    • Engaging the thighs and lifting the kneecaps while holding the pose contributes to building strong legs.
  • Improves Posture:
    • Mountain Pose helps realign the spine, improving posture and addressing imbalances in the body caused by poor alignment.
    • The pose encourages a straightened back, which reduces slouching and supports better overall posture.
  • Increases Focus:
    • Holding Tadasana requires mindful breathing and focus, enhancing concentration and mental clarity.
    • By tuning into your breath, you can improve your ability to focus both on and off the mat.
  • Calms the Mind:
    • Tadasana encourages stillness and can calm an overactive mind by reducing mental clutter.
    • This pose is beneficial for stress relief, as it facilitates deep, slow breathing.
  • Enhances Body Awareness:
    • Practicing Mountain Pose helps develop a deeper awareness of your body’s alignment and balance.
    • It encourages a greater understanding of how different parts of the body work together to maintain stability.

Step-by-Step Instructions for Tadasana:

Follow these steps to practice Mountain Pose correctly:

  1. Feet Placement:
    • Stand with your feet hip-width apart, toes pointing forward. Keep your feet grounded and parallel to each other.
  2. Activate the Legs:
    • Engage your thigh muscles and lift your kneecaps to activate the legs.
  3. Neutral Pelvis:
    • Lengthen your tailbone towards the floor, creating a neutral pelvis position.
  4. Roll the Shoulders:
    • Roll your shoulders back and down, opening up the chest and lifting the sternum.
  5. Arms and Hands:
    • Keep your arms relaxed at your sides, with palms facing forward.
  6. Neck and Head:
    • Gently tuck your chin to lengthen the back of the neck and maintain a straight alignment.
  7. Gaze:
    • Keep your gaze forward, with a soft and relaxed facial expression.
Tadasana (Mountain Pose)

Precautions for Practicing Tadasana:

While Mountain Pose is generally a safe pose, there are a few precautions to keep in mind:

  • Low Blood Pressure: Avoid this pose if you have low blood pressure or suffer from dizziness.
  • Injuries: Consult a healthcare professional before practicing Tadasana if you have knee or ankle injuries.
  • Pregnancy: Pregnant women should practice this pose only under the guidance of a certified yoga instructor.

Frequently Asked Questions about Tadasana:

Here are some common questions regarding Tadasana:

  1. Is Tadasana suitable for beginners?
    • Yes, Mountain Pose is a great starting pose for beginners as it helps build strength, flexibility, and proper alignment.
  2. How long should I hold Tadasana?
    • Hold Mountain Pose for 30 seconds to 1 minute, gradually increasing the time as you gain strength and confidence.
  3. Can pregnant women practice Mountain Pose?
    • Pregnant women can practice Mountain Pose with proper guidance. Consult with a doctor before starting yoga during pregnancy.
  4. Can Tadasana improve my posture?
    • Yes, Mountain Pose improves posture by aligning the spine and strengthening the back, shoulders, and neck muscles.
  5. Are there variations of Mountain Pose?
    • Some popular variations include the Raised Hands Pose (Urdhva Hastasana) and Extended Triangle Pose (Utthita Trikonasana).
  6. Can Tadasana help reduce anxiety?
    • Yes, the calming effect of deep, controlled breathing in Tadasana can help alleviate stress and anxiety.
  7. Is it normal to feel discomfort while practicing Mountain Pose?
    • Mild discomfort is common, especially if you are new to yoga. However, intense pain should not be ignored.

Tadasana for Yoga Teacher Training:

For those looking to deepen their practice, Tadasana serves as an essential foundation. Whether you are enrolling in a 200 Hour Yoga Teacher Training Course in Rishikesh, a 300 Hour Yoga Teacher Training in Rishikesh, or a 500 Hour Yoga Teacher Training in Rishikesh, mastering the Mountain Pose is crucial for understanding proper alignment and balance.

Mountain Pose Yoga Teacher Training in Rishikesh is perfect for those looking to learn the core principles of yoga asanas and deepen their knowledge in a spiritual setting.

Conclusion: Incorporating Tadasana into Your Daily Routine

Practicing Mountain Pose regularly can be immensely beneficial for improving posture, strengthening the body, and calming the mind. By incorporating this foundational pose into your daily routine, you not only align the body physically but also enhance your mental clarity and focus. Mountain Pose helps build a strong foundation for more advanced yoga poses and is perfect for anyone, from beginners to seasoned practitioners.

Incorporate Mountain Pose into your routine to experience the physical and mental benefits that can help you lead a more balanced and mindful life.

Strengthen Your Immune System

Boost Your Immune System Naturally with These 5 Nutrient-Rich Juices

Immune System and Its Role

Our immune system is constantly at work, protecting us from harmful microbes found in the air, water, and soil. It defends against pathogens like bacteria, fungi, viruses and parasites. However, certain factors can weaken immunity, leading to frequent illnesses.

At Gurukul Yogashala, one of the best yoga teacher training centers in Rishikesh, you will gain insights into the human immune system through yoga anatomy and physiology classes. Here, you’ll learn about:

Signs of a Strong Immune System

  • How the immune system fights infections
  • Which cells activate your immune system
  • What causes immune system weakening with age
  • How immune system disorders affect the body
  • How lifestyle choices impact immunity
  • Immune System And Inflammation Ayruda
  • Patients With Immune System Disorders Lsat

If your immune system is functioning optimally, you may notice:

Fewer infections and faster recovery from illnesses
Quick healing of wounds
Increased energy levels and overall vitality
Reduced inflammation and improved body functions

Can COVID Cause a Dysregulated Immune System?

Many patients with immune system disorders post-COVID-19 have experienced immune dysregulation ___occur when the immune system attacks healthy tissue quizlet. This means that the body’s defense mechanism becomes overactive or underactive, leading to increased susceptibility to infections or autoimmune conditions.

Does Your Immune System Know About Your Eyes?

Interestingly, certain parts of the body, such as the eyes are considered immune-privileged. This means they are protected from excessive immune responses to prevent inflammation and damage.

How Nutrition Enhances Your Immune System

A well-balanced diet plays a crucial role in strengthening immunity. At Gurukul Yogashala, students undergoing 200-hour, 300-hour, and 500-hour yoga teacher training in Rishikesh learn about the connection between diet and immune function.

Key Nutrients That Boost Immunity

Include the following in your diet to support a healthy immune response:

  • Vitamin C – Found in oranges, lemons, strawberries, and tomatoes
  • Vitamin D – Present in mushrooms, fortified dairy, and sunlight exposure
  • Antioxidants – Found in spinach, kale, beets, and green tea
  • Probiotics – Present in yogurt, kefir, and fermented foods

Top Homemade Juices to Strengthen Your Immune System

Green Apple, Carrot, and Orange Juice

  • Benefits: High in Vitamin C, A and B6, which help activate the immune system
  • How It Helps: Strengthens white blood cell production and boosts overall immunity

Beet, Carrot, Ginger, and Apple Juice

  • Benefits: Anti-inflammatory properties reduce immune system-related inflammation
  • How It Helps: Supports people with immune system disorders like rheumatoid arthritis

Kale, Tomato, and Celery Juice

  • Benefits: Packed with magnesium, potassium and Vitamin C for immune support
  • How It Helps: Prevents immune system attacks on healthy tissue (autoimmune reactions)

Strawberry and Kiwi Juice

  • Benefits: High in Vitamin C and probiotics for gut health
  • How It Helps: Improves digestion and supports a strong immune defense

Strawberry and Mango Juice

  • Benefits: Rich in Vitamin D, which is crucial for immunity
  • How It Helps: Reduces the risk of immune system weakening with age

Watermelon Mint Juice

  • Benefits: Hydrating and high in arginine for immune cell activation
  • How It Helps: Helps maintain the fastest immune system ever with hydration and essential nutrients

Celery Juice

  • Benefits: Hydrating and rich in antioxidants
  • How It Helps: Prevents dehydration, which can weaken immune responses

Tomato Mint Juice

  • Benefits: High in folate and Vitamin C, supporting immune cell function
  • How It Helps: Boosts recovery from infections and enhances energy levels

Cucumber, Kale, and Spinach Juice

  • Benefits: Packed with folate, iron and zinc essential for immunity
  • How It Helps: Reduces inflammation and improves the body’s ability to fight infections

Orange and Basil Juice

  • Benefits: Basil is known for its antibacterial and antiviral properties
  • How It Helps: Helps prevent fevers and infections, enhancing immunity naturally
Strengthen Your Immune System - Best yoga teacher training school in rishikesh - Gurukul Yogashala

How to Incorporate These Juices into Your Daily Routine

To get the best results, follow these simple tips:

✔ Start your day with a fresh juice instead of coffee or tea
✔ Replace unhealthy snacks with nutrient-rich juices
✔ Use immune-boosting juices as marinades for meals
✔ Drink a variety of juices to get a range of essential nutrients

Conclusion

At Gurukul Yogashala, one of the most renowned yoga schools in Rishikesh, you will not only learn yoga but also develop a holistic lifestyle that strengthens your immune system. By incorporating these nutrient-dense juices into your daily routine and practicing yoga regularly, you can achieve better health, vitality, and inner balance.

If you are looking for a transformative experience, consider enrolling in a 200-hour yoga teacher training course in Rishikesh or advance to a 300-hour or 500-hour yoga teacher training in Rishikesh to deepen your knowledge of yoga and wellness.

Daily Yoga Practice

The Ultimate Guide to Daily Yoga Practice: Benefits & Best Training Programs

Over the past decade, yoga has gained immense popularity worldwide. The ancient practice, once limited to spiritual seekers, is now recommended by medical professionals for its preventive and therapeutic benefits. Many people turn to daily yoga practice for better health, stress relief and overall well-being.

Rishikesh, the Yoga Capital of the World, has become a hub for yoga enthusiasts. Whether you seek a short retreat or aim to become a certified yoga instructor, you’ll find various options, including:

Let’s explore the importance of yoga daily practice, its benefits and how you can integrate it into your lifestyle.


What Is Yoga?

Yoga is more than just physical postures. It is a holistic practice that integrates:

  • Asanas (Physical Postures) – Enhance flexibility and strength
  • Pranayama (Breathing Techniques) – Improve lung capacity and mental clarity
  • Meditation & Kriyas – Promote relaxation and spiritual awakening

The ultimate goal of yoga is to unite the mind, body, and soul, creating harmony within oneself.


Benefits of Daily Yoga Practice

1. Physical Benefits of Daily Yoga Practice

Practicing yoga daily can lead to noticeable improvements in physical health, including:

  • Increased Flexibility – Reduces stiffness and enhances mobility
  • Strength Building – Engages muscles effectively, replacing the need for heavy workouts
  • Posture Correction – Helps counteract the effects of prolonged sitting
  • Improved Digestion – Certain poses stimulate digestion and detoxification
  • Enhanced Immunity – Boosts the body’s ability to fight infections

Joining a structured program like the Best Yoga Teacher Training in Rishikesh ensures proper guidance and maximum benefits.

2. Mental & Psychological Benefits

A consistent yoga daily practice has profound effects on mental health, such as:

  • Reduces Stress & Anxiety – Deep breathing techniques calm the nervous system
  • Boosts Mood & Happiness – Yoga stimulates serotonin and dopamine production
  • Improves Sleep Patterns – Helps combat insomnia and enhances sleep quality
  • Enhances Focus & Clarity – Meditation strengthens cognitive abilities
  • Aids in Emotional Balance – Encourages self-awareness and emotional stability

Many individuals enroll in daily yoga practice online courses to experience these benefits from the comfort of their homes.

3. Spiritual Benefits of Yoga

Beyond physical and mental health, yoga also nurtures the soul:

  • Develops Self-Awareness – Encourages mindfulness and inner reflection
  • Strengthens Connection with the Universe – Fosters spiritual growth
  • Encourages Positive Intentions – Helps align personal goals with universal energy
  • Deepens Meditation Practices – Facilitates a more profound spiritual experience

For those seeking a more immersive experience, advanced programs like the 300 Hour Yoga Teacher Training in Rishikesh offer deeper insights into yoga philosophy.


How to Practice Yoga Daily at Home?

Wondering how to practice yoga daily at home? Here’s a simple guide to get started:

  1. Set a Fixed Time – Mornings are ideal for energy and focus
  2. Create a Dedicated Space – A quiet, clutter-free area enhances practice
  3. Start with Basic Poses – Gradually progress to more advanced asanas
  4. Include Pranayama & Meditation – Balance breathwork with mindfulness
  5. Stay Consistent – Even 20 minutes a day can yield results

If you’re unsure about how long should I practice yoga daily, start with 15-30 minutes and gradually extend based on your comfort level.

Daily Yoga Practice - Best yoga teacher training school in Rishikesh

Daily Yoga Practice Results: What to Expect?

If you maintain a daily yoga practice, expect significant transformations:

  • Week 1: Improved flexibility, better posture, and mental calmness
  • Week 4: Noticeable strength, reduced stress, and improved digestion
  • 3 Months: Enhanced focus, deeper sleep, and emotional stability
  • 6+ Months: A complete lifestyle shift towards holistic well-being

For structured learning, consider enrolling in a 200 Hour Yoga Teacher Training Course in Rishikesh, which provides a strong foundation in both practice and philosophy.


Best Yoga Teacher Training in Rishikesh

If you’re looking for the best yoga teacher training in Rishikesh, Gurukul Yogashala is a top choice. They offer:

Their courses provide in-depth training in Ashtanga yoga daily practice, Hatha yoga, meditation and philosophy, ensuring a holistic learning experience.


Final Thoughts

A daily yoga practice is more than just a workout—it’s a pathway to a healthier, more balanced life. Whether you practice at home or join a structured course, consistency is key.

For those looking to deepen their practice or start a teaching career, the Best Yoga Teacher Training in Rishikesh at Gurukul Yogashala offers the perfect environment for growth.

Embrace yoga, transform your life, and experience the true essence of well-being!

Vegan Diet

Vegan Diet: 5 Benefits, Drawbacks, and Its Connection to Yoga in Rishikesh

Vegan Diet: The global health and wellness industry has witnessed a significant shift in recent years, especially post-COVID-19. People have become increasingly conscious of their diet, leading to the rise of various food trends like Vegan diet. One such trend that has gained immense popularity is veganism.

A vegan diet excludes all forms of animal products, including meat, dairy and eggs. Some strict vegans even avoid honey due to ethical concerns. While many embrace veganism for health benefits, others adopt it due to its ethical and environmental impact.

In India, especially in yoga schools in Rishikesh, veganism is integrated into the Sattvic diet, as prescribed in the Vedic texts. If you are considering a 200-hour, 300-hour or 500-hour Yoga Teacher Training in Rishikesh, you can experience a vegan lifestyle alongside traditional yogic practices.

Let’s explore the meaning in Hindi, its benefits, potential drawbacks and how it is becoming a part of yoga retreats.


What Is a Vegan Diet?

A vegan diet is a plant-based diet that excludes all animal-derived products. This means avoiding:

  • Meat & Fish – Beef, chicken, pork, mutton, seafood.
  • Eggs – Including baked goods made with eggs.
  • Dairy Products – Milk, cheese, butter, ghee and yogurt.
  • Animal-Derived Products – Honey, gelatin, casein, and shellac.

Many yoga teacher training courses in Rishikesh, such as Gurukul Yogashala, follow a vegan diet as part of their holistic wellness programs.


Why Do People Choose a Vegan Diet?

1. Ethical Concerns

  • Compassion for Animals – Ethical vegans believe animals have the right to live freely without exploitation.
  • Opposition to Factory Farming – Many animals raised for food suffer in inhumane conditions, confined to small spaces.
  • Alignment with Yogic Philosophy – The yogic principle of Ahimsa (non-violence) encourages avoiding harm to all living beings.

2. Environmental Impact of a Vegan Diet

  • Studies show that animal agriculture is responsible for significant greenhouse gas emissions.
  • Meat production requires more land, water, and food resources compared to plant-based diets.
  • Switching to a vegan diet helps in reducing carbon footprints and conserving the planet’s resources.

3. Health Benefits

A high-protein diet provides numerous health benefits, which we will explore in the next section.


5 Health Benefits of a Vegan Diet

1. Packed with Essential Nutrients

  • A well-planned vegan diet includes whole grains, vegetables, legumes, nuts, seeds and fruits.
  • It is rich in fiber, antioxidants, vitamins (B12, D), and minerals (iron, calcium, potassium, magnesium).
  • Supplements or fortified foods can help meet specific nutritional needs, such as vitamin B12 and omega-3 fatty acids and also studies show anemic tebdacy with jut a diet.

2. Aids in Weight Loss

  • Studies show that people following a diet tend to have a lower BMI and body fat percentage.
  • Vegan foods are low in calories and high in fiber, promoting a feeling of fullness and preventing overeating.
  • Many yoga schools in India encourage a plant-based diet to maintain optimal body weight.

3. Improves Blood Sugar Levels and Kidney Function

  • A vegan diet helps regulate blood sugar levels, reducing the risk of Type 2 diabetes.
  • Plant-based diets reduce the strain on kidneys by lowering the intake of processed proteins.
  • Many yoga practitioners following a vegan lifestyle experience enhanced energy levels and mental clarity.

4. Reduces the Risk of Chronic Diseases

  • Identify vegan diet are associated with a lower risk of heart disease due to the absence of cholesterol and saturated fats found in animal products.
  • The abundance of fruits, vegetables, and whole grains in a vegan diet supports heart health and overall immunity.
  • Research suggests that phytonutrients in plant foods help reduce the risk of certain types of cancer.

5. Boosts Gut Health and Digestion

  • A vegan diet supports a diverse gut microbiome, which improves digestion and nutrient absorption.
  • The high fiber content in plant-based foods promotes a healthy digestive system and prevents bloating.
  • A balanced gut microbiome also enhances mental health, as gut health and brain function are closely connected.

Potential Disadvantages of a Vegan Diet

While a vegan diet has several benefits, it also comes with some potential drawbacks:

1. Nutrient Deficiencies

  • Lack of vitamin B12, iron, omega-3 fatty acids, and calcium can lead to deficiencies if not managed properly.
  • People on a vegan diet may need to rely on fortified foods or supplements to meet these nutritional requirements.

2. Increased Risk of Anemia

  • Studies show that people following a strict vegan diet may have a higher tendency to develop anemia due to iron deficiency.
  • Including plant-based iron sources like lentils, tofu, spinach, and nuts can help prevent this issue.

3. Social and Lifestyle Challenges

  • Finding vegan food options while traveling or dining out can be challenging in certain regions.
  • Social gatherings and traditional diets may not always accommodate vegan preferences.

Vegan Diet and Yoga in Rishikesh

If you are looking for a holistic lifestyle that combines yoga and veganism, Rishikesh is the perfect destination. Many yoga schools, such as Gurukul Yogashala, offer:

These training programs incorporate vegan meals, aligning with the Sattvic diet, to enhance physical and mental well-being.


Conclusion

A vegan diet offers numerous health benefits, like vegan diet improves eye sight study shows from improving digestion and weight management to enhancing mental clarity. It also has a positive environmental impact, reducing carbon footprints and promoting sustainability.

For those looking to combine yoga and a plant-based lifestyle, Rishikesh provides the perfect opportunity. Whether you join a 200-hour, 300-hour, or 500-hour yoga teacher training program, you can experience the profound benefits of veganism in a yogic environment.

Are you ready to embrace a vegan diet and embark on a transformative journey with yoga in Rishikesh?

Benefits of Shatkarmas

Shatkarma: Ancient Yogic Cleansing for Mind & Body Purification

Benefits of Shatkarmas, If you’re practicing asanas but still feel blocked in your progress, you might need something beyond physical exercises. Internal cleansing is just as important as external fitness. When your internal organs function optimally, your energy flows effortlessly, allowing you to focus on deeper yogic practices.

Shatkarma, a set of yogic cleansing techniques, helps remove toxins, enhance physiological functions and bring mental clarity. These kriyas are a crucial part of traditional Shatkarma yoga, preparing the body for higher spiritual pursuits. If you’re considering the 200 hour yoga teacher training course in Rishikesh, you will explore these powerful techniques in depth.

Let’s delve into what Shatkarma is, Benefits of Shatkarmas and the six purification techniques that can transform your yoga journey.


What is Shatkarma? Benefits of Shatkarmas

Shatkarma refers to six purification techniques described in the Hatha Yoga Pradipika. These practices detoxify the body, improve organ function, and enhance overall well-being. When practiced correctly, they help balance the body’s internal energy or Prana, making it easier to advance in yoga.

It’s essential to learn these kriyas under expert guidance at the Best Yoga Teacher Training in Rishikesh, such as Gurukul Yogashala, to ensure safe and effective practice


Health Benefits of Shatkarmas

Practicing Shatkarma kriyas regularly offers a range of benefits, including:

Detoxification: Removes toxins from the body, improving organ function.
Enhanced Digestion: Stimulates the digestive system and promotes gut health.
Respiratory Health: Clears nasal passages and strengthens lung capacity.
Mental Clarity: Improves focus, concentration, and reduces stress.
Balanced Energy: Helps in maintaining the equilibrium of the body’s energy channels.
Weight Management: Aids in metabolism and supports weight regulation.
Preparation for Pranayama & Meditation: Cleanses the system for deeper breathing and meditation.

Now, let’s explore each Shatkarma kriya in detail.

Benefits of Shatkarmas - Best Yoga Tearcher School in Rishikesh | Gurukul Yogashala

Types of Shatkarma Kriyas

1. Dhauti Kriya (Alimentary Canal Cleansing)

Dhauti kriya is a deep cleansing technique that targets the digestive system. It is practiced in different ways:

  • Antar Dhauti: Involves swallowing and extracting a soft cotton cloth to remove impurities from the stomach and throat.
  • Varisara Dhauti: Involves drinking saline water and eliminating it through specific yogic postures.
  • Danta Dhauti: Cleanses the teeth and gums for oral health.
  • Vyaghra Dhauti: Helps in expelling undigested food by inducing vomiting, inspired by the way tigers cleanse their stomachs.

This kriya is extensively taught in the best yoga teacher training course in Rishikesh, where students practice it under expert supervision.


2. Basti Kriya (Colon Cleansing / Yogic Enema)

Basti Shatkarma is a powerful technique for detoxifying the large intestine. It involves two main methods:

  • Jala Basti: Sitting submerged in water, drawing water into the rectum, and releasing it to cleanse the colon.
  • Sthala Basti: Using air instead of water to purify the intestines.

This technique removes toxins, improves digestion, and strengthens the digestive tract. It is especially beneficial for individuals suffering from constipation and bloating.


3. Neti Kriya (Nasal Cleansing)

Neti kriya is highly effective in clearing nasal blockages and enhancing respiratory function. It has two main types:

  • Jal Neti: Uses warm saline water and a Neti pot to flush out nasal passages.
  • Sutra Neti: Involves passing a soft cotton thread through the nostrils and out through the throat to remove blockages.

Regular practice of Neti kriya enhances breathing efficiency, improves oxygen intake, and even helps in opening the Third Eye chakra.


4. Trataka (Eye Cleansing & Concentration Practice)

Trataka is a meditative practice that involves focused gazing. It helps in:

  • Improving eyesight and eye health.
  • Enhancing mental clarity and focus.
  • Strengthening the nervous system.

Practitioners usually focus on a candle flame or a single point without blinking, which sharpens concentration and supports meditative states.


5. Nauli Kriya (Abdominal Massage & Core Strengthening)

Nauli kriya is an advanced technique that involves massaging the abdominal organs through rapid side-to-side movements. It has three variations:

  • Central Nauli: Engages the middle abdominal muscles.
  • Right & Left Nauli: Isolates the abdominal muscles on each side.
  • Abdominal Churning: Moves the muscles in a circular motion to stimulate digestion.

This kriya enhances digestion, strengthens the core, and balances the internal organs.


6. Kapalbhati (Cleansing Breath Technique)

Kapalbhati is a unique kriya that also falls under Pranayama. It involves forceful exhalation and passive inhalation to remove stale air and toxins from the lungs.

Benefits of Kapalbhati:

Improves respiratory health and lung capacity.
Enhances mental clarity and focus.
Supports weight loss by boosting metabolism.
Reduces stress and anxiety, making meditation easier.

Regular practice of Kapalbhati is highly recommended for yoga practitioners at all levels.


Shatkarma and Yoga Teacher Training in Rishikesh

Shatkarma kriyas are an integral part of yoga education. If you want to master these cleansing techniques, enrolling in a 300 Hour Yoga Teacher Training in Rishikesh or a 500 Hour Yoga Teacher Training in Rishikesh is highly beneficial.

At Gurukul Yogashala, students receive step-by-step guidance on practicing Shatkarma safely and effectively. The 200 hour yoga teacher training course in Rishikesh covers these techniques in detail, along with asanas, Pranayama, and meditation.


Final Thoughts

Shatkarma kriyas play a crucial role in physical detoxification and mental purification. With regular practice, they enhance overall health, improve focus, and prepare the body for higher yogic practices.

If you’re looking to deepen your yoga journey, consider joining the Best Yoga Teacher Training in Rishikesh at Gurukul Yogashala. These ancient techniques, passed down by sages, can help you achieve inner balance and spiritual growth.

Cleanse your body, clear your mind, and elevate your yoga practice with Shatkarma!

Yoga Poses to Improve Flexibility and Strength

9 Best Yoga Poses to Improve Flexibility and Strength

Yoga Poses to Improve Flexibility and Strength

In today’s world, where fitness is a priority, achieving flexibility and strength is essential for overall well-being. Yoga is one of the most effective ways to improve mobility, prevent injuries, and boost energy levels. Unlike weight training or aerobic exercises, yoga strengthens the body holistically while increasing flexibility.

If you’re looking to deepen your yoga practice or train professionally, consider joining the Best Yoga Teacher Training in Rishikesh. Programs like the 200 Hour Yoga Teacher Training Course in Rishikesh, 300 Hour Yoga Teacher Training in Rishikesh, and 500 Hour Yoga Teacher Training in Rishikesh offer structured guidance to refine your skills.

Let’s explore some of the most effective yoga poses to enhance strength and flexibility.

Yoga Poses to Improve Flexibility and Strength

Why Are Flexibility and Strength Important?

  • Flexibility: The ability to move joints and limbs without restriction. Flexible muscles prevent injuries and improve posture.
  • Strength: A combination of endurance and power, strength helps in better movement execution and reduces fatigue.
  • Balance: A well-balanced body ensures stability, reduces falls, and enhances overall mobility.
  • Injury Prevention: Regular practice of yin yoga poses, restorative yoga poses, and other forms helps prevent strains, sprains, and muscle stiffness.

How Yoga Improves Flexibility and Strength?

  • Increases Range of Motion: Stretching postures improve joint flexibility and mobility.
  • Enhances Muscular Strength: Weight-bearing postures in yoga build endurance and muscle power.
  • Improves Posture & Balance: Proper alignment reduces strain on joints and muscles.
  • Boosts Stamina & Energy Levels: Holding poses for a longer duration improves endurance.

Now, let’s dive into the top yoga poses for flexibility and strength.


9 Best Yoga Poses for Flexibility & Strength

1. Child Pose Yoga (Balasana)

  • A gentle stretch for the spine, hips, and thighs.
  • Relieves stress, improves flexibility, and enhances relaxation.
  • Ideal for beginners and those practicing restorative yoga poses.

2. Frog Pose Yoga (Bhekasana)

  • Deeply stretches the hips, groin, and inner thighs.
  • Improves mobility and helps in relieving lower back pain.
  • Often practiced in yin yoga poses for deep stretching.

3. Leg Over Leg Yoga Pose (Gomukhasana)

  • A fantastic hip-opener that also stretches the shoulders and chest.
  • Improves posture and flexibility in the lower body.
  • Helps relieve sciatic pain and tightness in the hips.

4. Yoga Poses Foot Behind Head (Eka Pada Sirsasana)

  • Advanced pose that enhances flexibility in the hips, hamstrings, and spine.
  • Strengthens the core and improves focus.
  • Recommended for experienced practitioners.

5. Three Person Yoga Poses (Triple Downward Dog)

  • A fun and challenging pose that requires teamwork and balance.
  • Builds core strength, flexibility, and trust among partners.
  • Great for those looking to explore 3 people yoga poses.

6. Restorative Yoga Poses (Supta Baddha Konasana – Reclining Bound Angle Pose)

  • A deeply relaxing pose that opens the hips and chest.
  • Improves blood circulation and reduces stress.
  • Ideal for winding down after an intense practice.

7. Ardha Matsyendrasana (Half Lord of the Fishes Pose)

  • A powerful spinal twist that enhances flexibility and detoxifies the body.
  • Improves digestion and strengthens the back.
  • Regular practice keeps the spine healthy and mobile.

8. Chaturanga Dandasana (Four-Limbed Staff Pose)

  • Strengthens the core, arms, shoulders, and back.
  • Builds endurance and enhances overall stability.
  • A key pose in vinyasa yoga sequences.

9. Navasana (Boat Pose)

  • Builds core strength and improves balance.
  • Strengthens the abdomen, hip flexors, and spine.
  • Enhances focus and coordination.

How to Advance Your Yoga Practice?

If you’re serious about yoga and want to master these poses, consider enrolling in a structured program:

At Gurukul Yogashala, you’ll receive expert guidance, hands-on training, and in-depth knowledge of yoga.


Final Thoughts

Yoga is a powerful practice that enhances both flexibility and strength. By incorporating these poses into your routine, you can improve mobility, prevent injuries, and boost overall well-being. Whether you’re a beginner or an advanced practitioner, yoga offers something for everyone.

For a deeper understanding of yoga, consider joining a Yoga Teacher Training in Rishikesh. It’s an excellent way to refine your practice and share the benefits of yoga with others.

Ready to begin your yoga journey? Start practicing these poses today and experience the transformation!